Editing Worktop

In the kitchen planner, any base, corner or high cabinet placed by the customer in the kitchen project comes with a worktop. This worktop can be modified by the customer via the Edit panel of the cabinet: s/he can choose another worktop, switch top to bottom side in case of reversible worktops, define cut-outs and various operations, etc.
Moreover, worktops can be added as freestanding objects too (i.e. without legs or any support) to design a dining area for example.
All these modifications must be prepared beforehand by the Range Manager to ensure the expected behavior of the worktop.
➡️ See Set Up Worktops 🔗 or Set Up Worktops through API 🔗 for detailed information on this preparating work.
➡️ See Define Worktop Position 🔗 for detailed information on how to create the paths to position a worktop on a cabinet.
Basic Actions and Options
The basic actions regarding worktops are available on the scene and via the Edit panel of the cabinet. They allow the customer to add a worktop and then edit it.
Add a Worktop
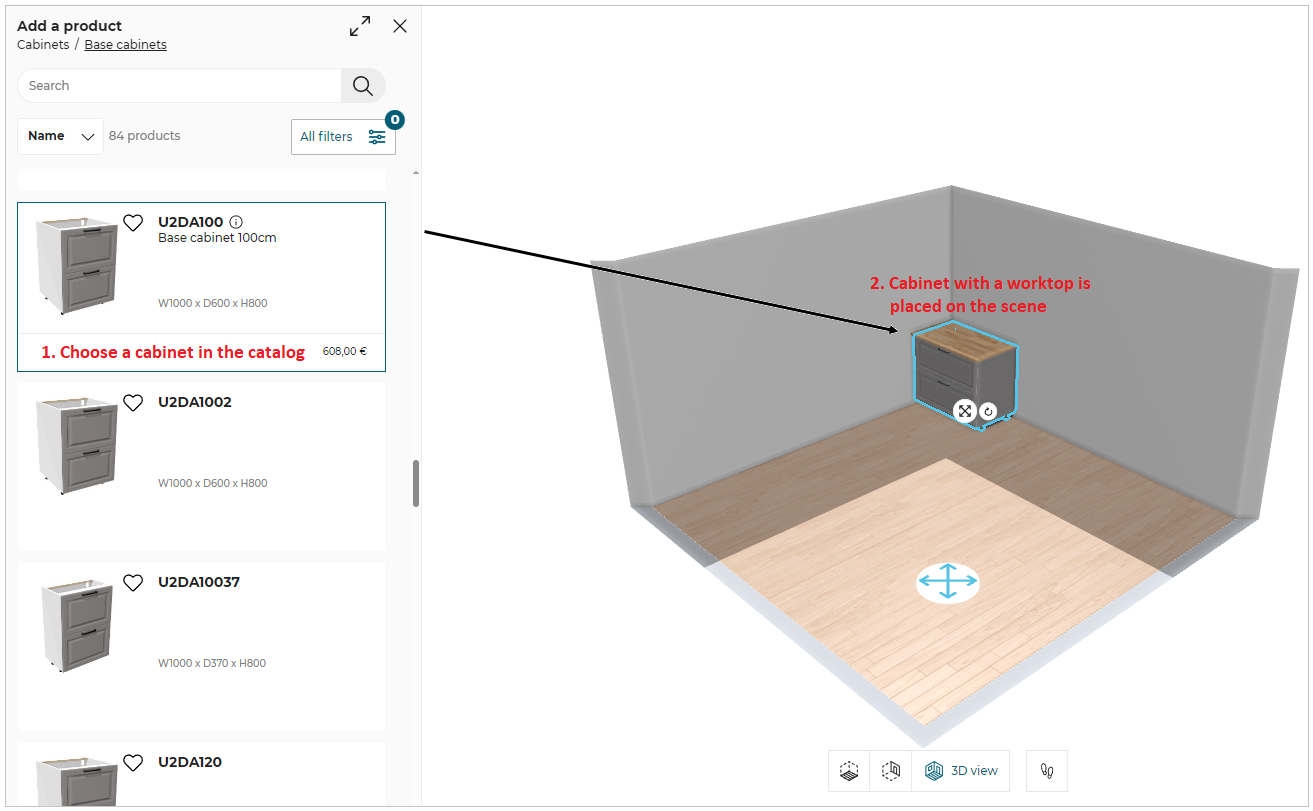
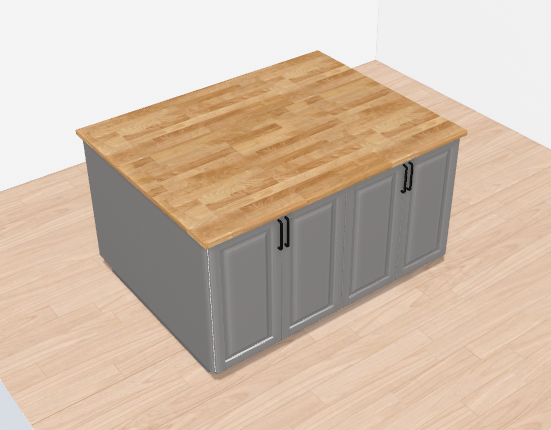
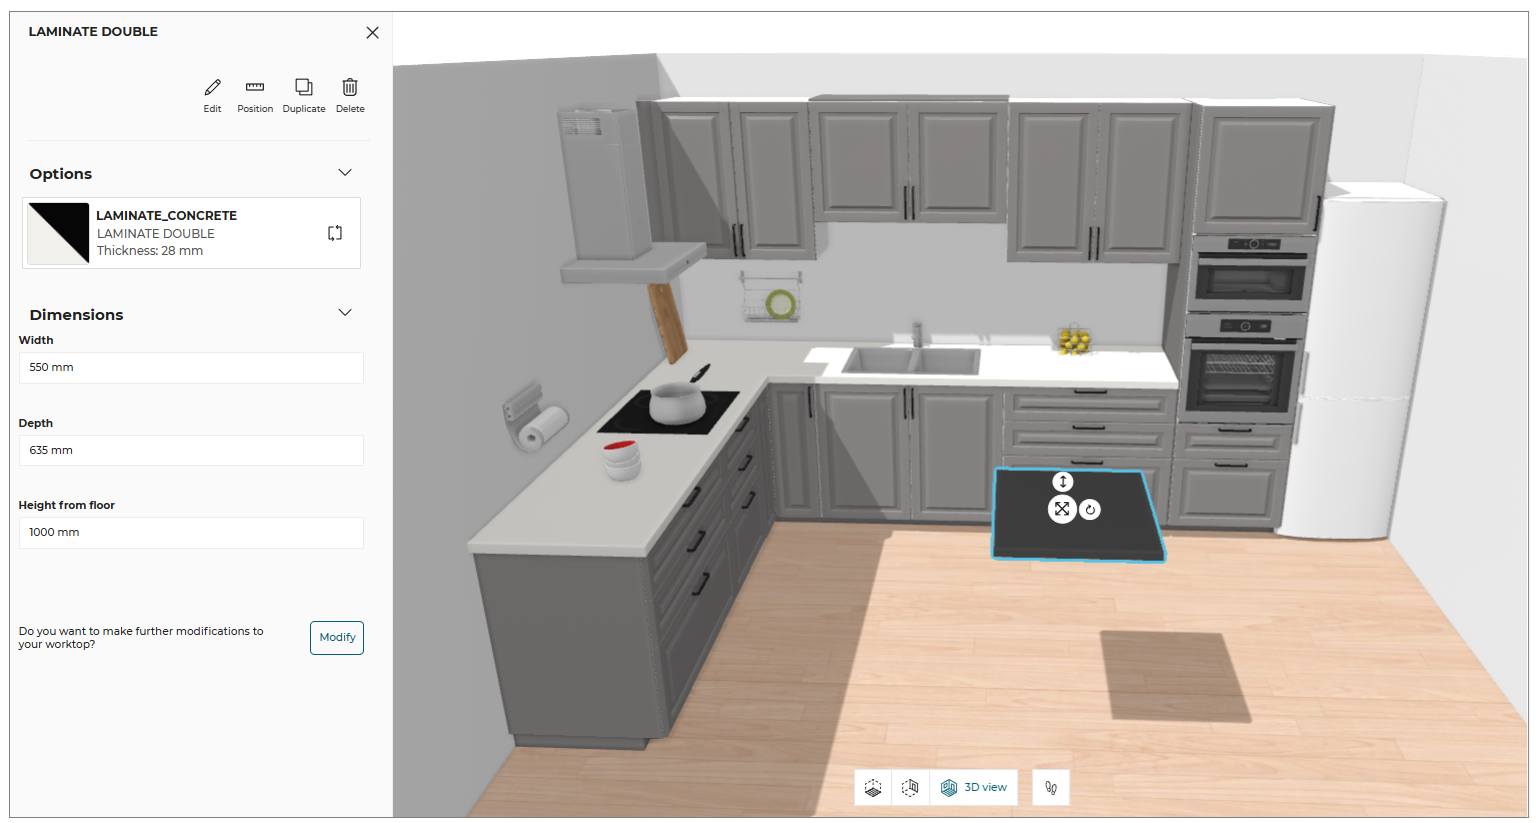
The most common way to add a worktop is to select a base, corner or high cabinet in the catalog. Cabinets have predefined worktops.
📌 It is recommended not to delete the worktop because there can be no cabinet without a worktop.
Diagonal corner worktop
-
Select diagonal corner cabinet.
-
Click the Edit button and activate the fullDepthWorktop option.
![]()
The full depth diagonal corner worktop added to the cabinet is displayed, as shown below:
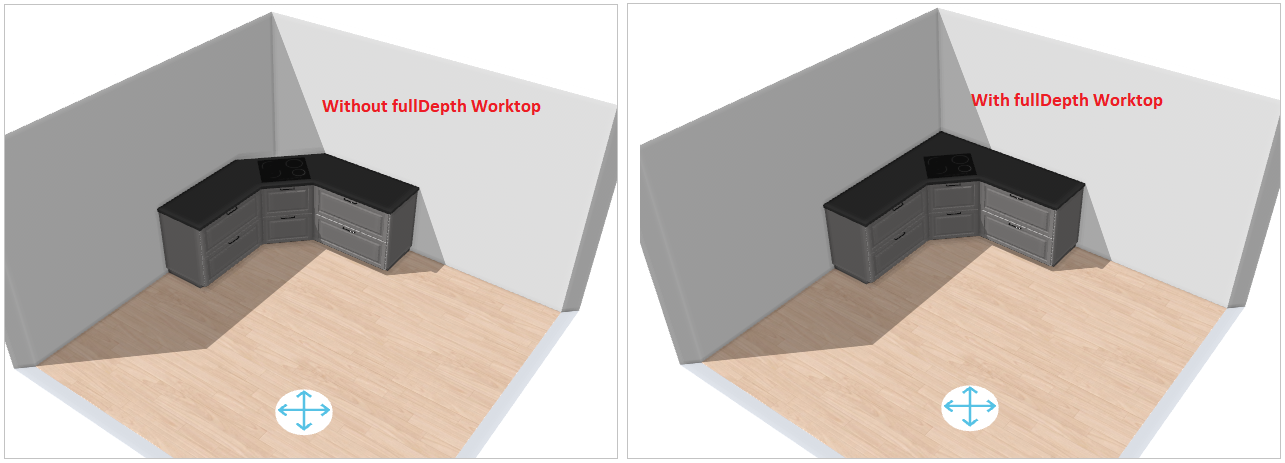
- While adding the diagonal corner cabinet, the worktop joints are automatically placed to match the shape of the diagonal corner cabinet.
- While pricing the diagonal corner worktop, if the worktop product in chosen shape exists with the retailer, then the product is priced. If not, then it is not priced.
Double Island Worktop
If 2 cabinets, or group of cabinets, are perfectly aligned back to back, only one rectangular worktop will be created on top of these cabinets.
📌 Since there is no "back" on a double island worktop, the default front edge is the one that is aligned with the front side of the first cabinet of this double island that has been created by the user. The positions of the right and left sides depends on this orientation (see Overhang and Waterfall sections)
Replace the Worktop
⚙️ Set up: Material parameters, 'worktopType' parameter.
⚙️ Set up: Application distribution parameter resetCustomizedLinear 🔗. If set to 'false', the modifications such as edge cut, cut-out, waterfall etc. done on worktop are kept after replacing it with another one. Its default value is set to 'true' to delete the modifications after replace.
When replacing a worktop with another, the customer actually changes the material of the worktop.
To replace the worktop on the cabinet:
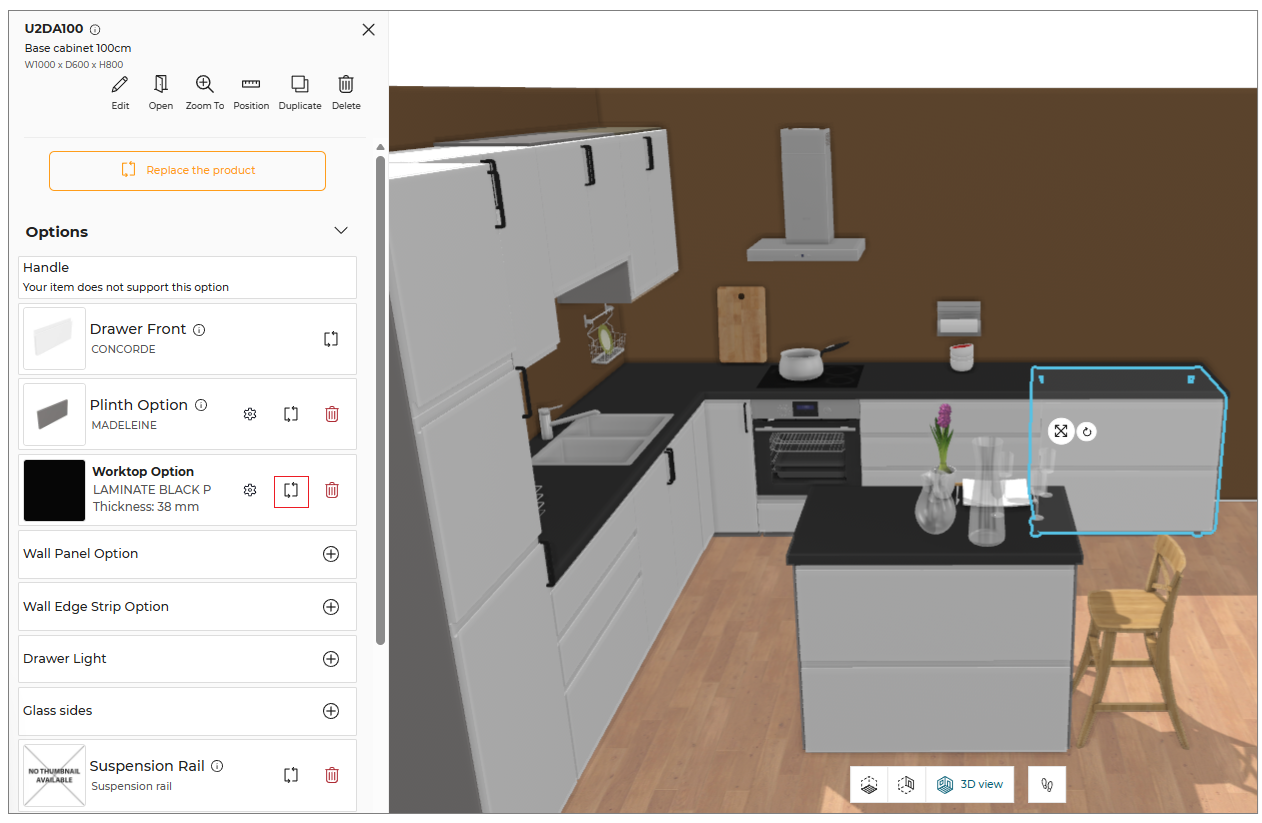
- Click the cabinet.
- Click the Edit option to open cabinet properties.
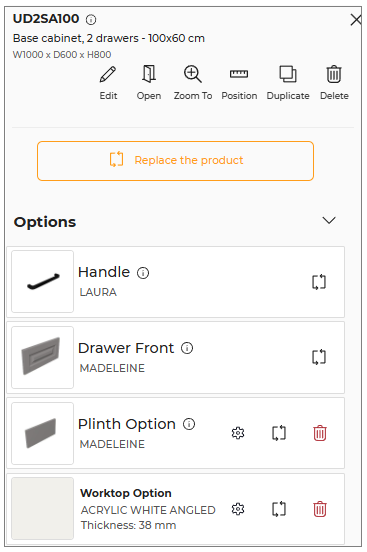
- Select the Replace option in the Worktop option in the edit panel, as shown below:
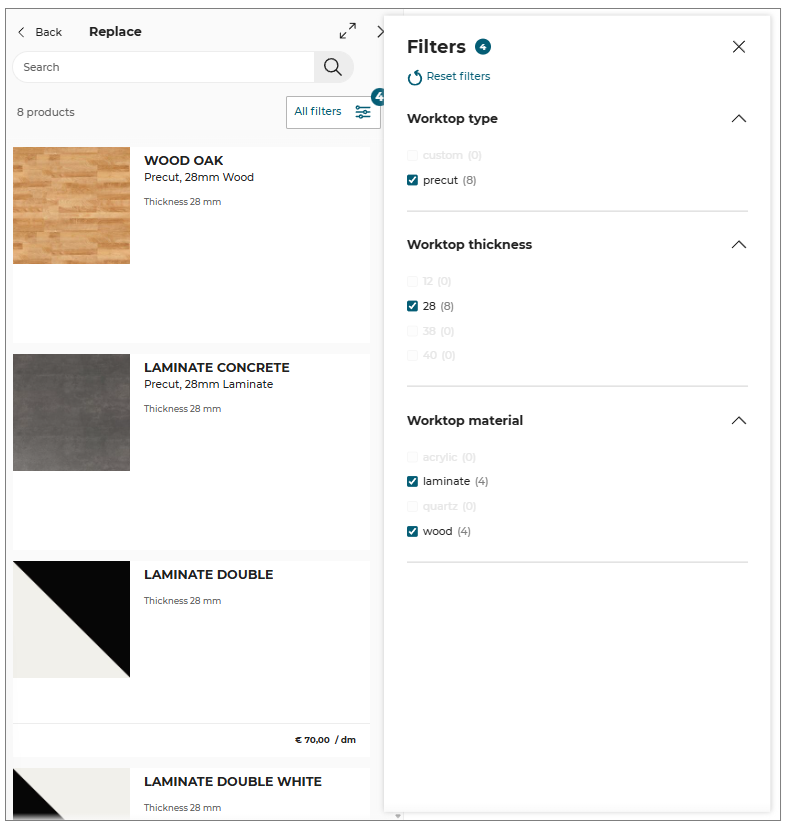
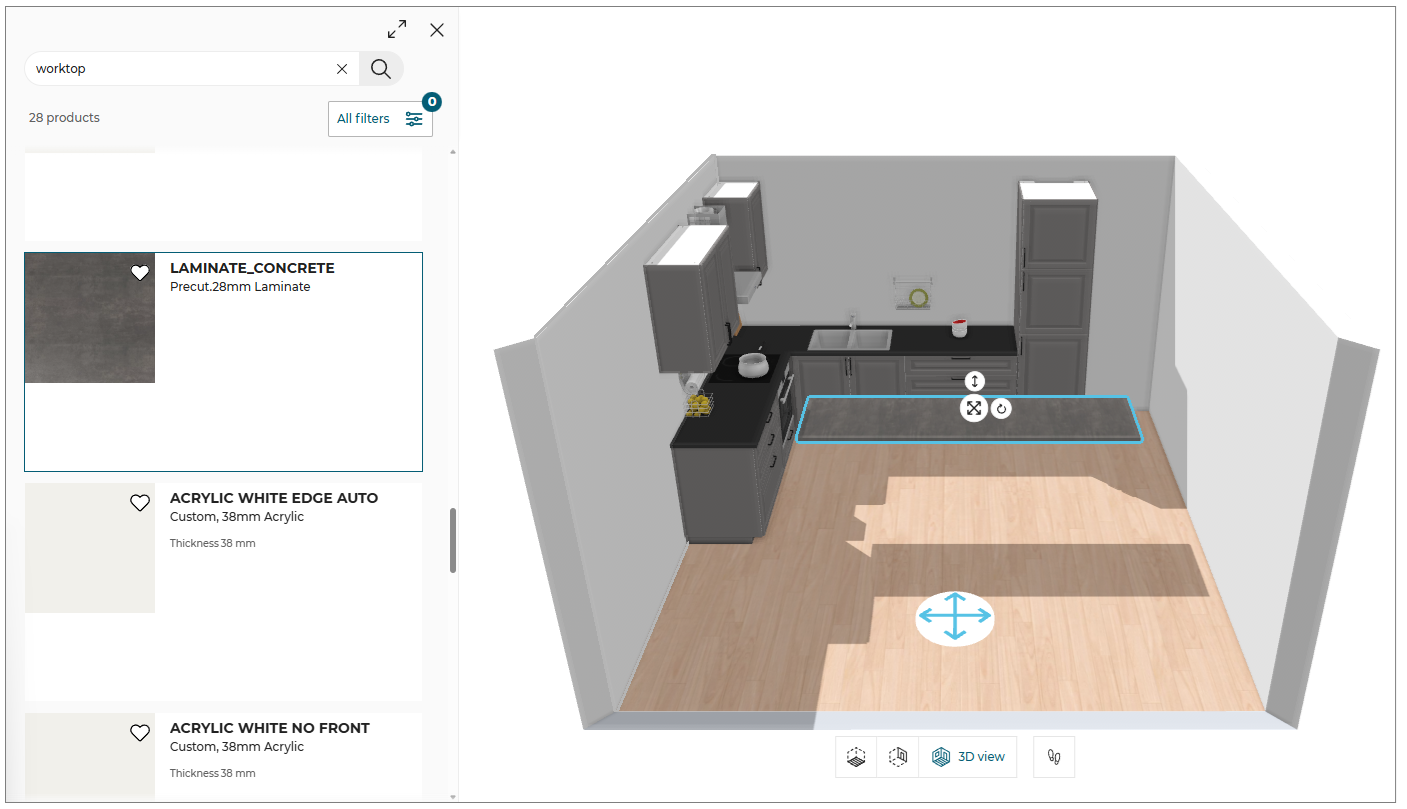
The worktop type option allows the customer to choose between a precut or a custom worktop to reduce the list of catalog items.
The applied worktop material is displayed at the top of the catalog.
Options for Replace:
Apply to all linears: It changes the feature for all the linears.
Apply to the selected linear: It changes the feature for the selected linear.
- Select the worktop from the catalog, choose between Apply to all linears or Apply to the selected linear, to replace the worktop on the cabinet.

Apply to all linearsandApply to the selected linearoptions are only be available when replacing Worktop, Wall edge strip, Cornice, Deco strip or Plinth/Leg of the cabinet.
Also, these options will be available when there are more than one linear in the kitchen.
Replacing the Custom Worktop
To replace the custom worktop:
Select the cabinet, click the Edit option.
From the Worktop option, click the Replace button, the list of worktop material available in the catalog is displayed.
Select the worktop material to replace the worktop of the selected cabinet.
The window to notify that the non-compatible options have been removed is displayed, as shown below:
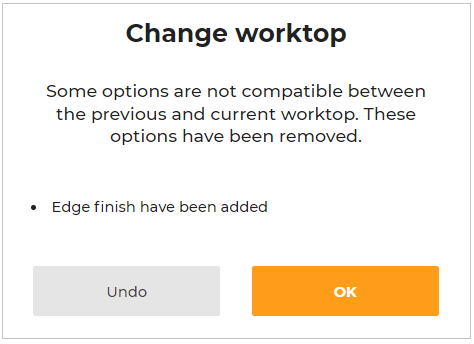
To discard the changes and keep the previous worktop, click the Undo button.
Reversible Worktops
⚙️ Set up: 'side' parameter, material parameters
Worktops products are said reversible if the top material is different than the bottom material. In that case, the side parameter allows users to select which side of the worktop should be facing up (available in the options menu as shown below).

Changing this setting flips the worktop and the result is visible in the planner.
Double-sided
⚙️ Set up: 'doubleSided', 'doubleSidedWaterfall' and 'doubleSidedProduct' parameters
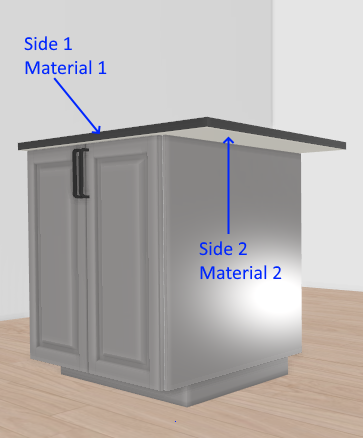
It is possible to specify if the worktop material should be applied to the bottom of the worktop. This notion is very different than the reversible worktops:
- activating double-sided applies the same material on the bottom part of the worktop
- double-sided is not visible in the planner 3D
- double-sided affects the Kitchen pricing and linear export, where reversible only controls if the worktop board is fliped or not.
It can be useful to define the double-sided option for your worktops if you sell an additional product for applying the material to the bottom of the worktop. This is typically convinient when users define an overhang so that the worktop bottom becomes visible.
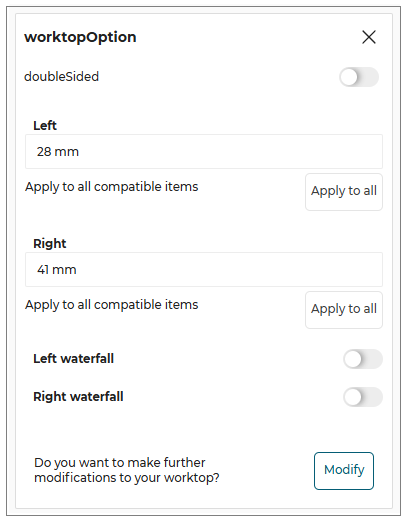
The parameters doubleSided and doubleSidedWaterfall control the activation of the double-sided operation for the horizontal boards and the waterfall boards respectively (available in the options menu as shown below).
Overhang
⚙️ Set up: Applicative Rule 'WorktopParameterRule' 🔗
➡️ See also the Applicative Rule WorktopOverhangSizeRule 🔗.
When a base cabinet is against a wall the worktop extends from the front to the back side that is touching the wall. On the left and right sides, the worktop ends above the side panels. The customer has the possibility to define an overhang on any side that is not touching a wall.

❗️ The applicative rule WorktopOverhangSizeRule 🔗 checks that the values specified by the customer do not exceed the overhang set up in the application distribution.
Waterfall
⚙️ Set up: waterfallPossible parameters waterfallPossible 🔗. and waterfallType parameters waterfallType 🔗.
➡️ See also the Applicative Rule WaterfallRule 🔗.
A waterfall can be specified on either the left or right side of the base cabinet when it is used as a finishing element in a combination or as a freestanding unit.
The waterfall option allows you to extend the worktop along the side panel to the floor from the top of the base cabinet.By using this option, you can harmonize the cabinet side color with the worktop color rather than using a dedicated side cover panel.
Vertical waterfall solution can be edited to include operations such as cutouts, splits, joints, etc. The editing options for vertical waterfalls are the same as for normal worktops.
In order to edit a waterfall, select the cabinet and click the Edit button from the side panel. The edit panel appears, as shown below:
In the edit panel, click the Options from the Worktop Option. The Waterfall solution window appears, as shown below:
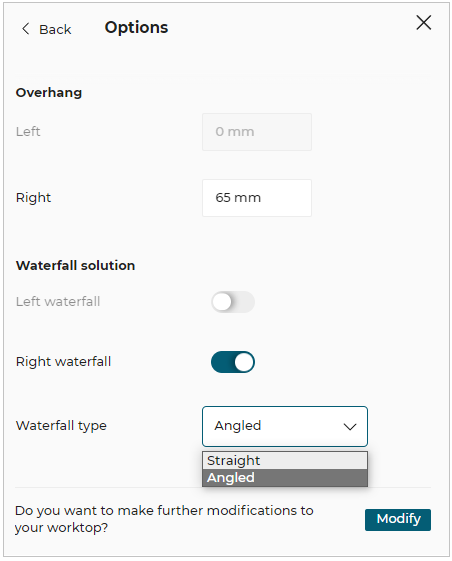
Waterfall type option specifies what type of waterfall is possible on the worktop.
There are two types of waterfall type available for worktops:
- Angled.
- Straight.
Click the Modify button, the confirmation window for editing the worktop appears, as shown below:
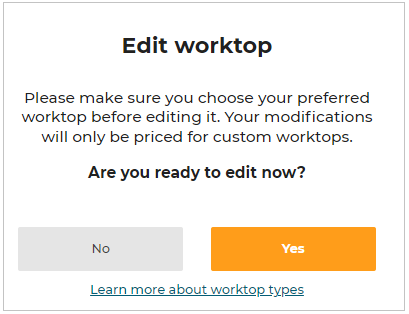
Click the Yes button to proceed. The Worktop editor window appears, as shown below:
If your design has issues, then the number of errors is displayed, as shown below:

To edit/remove the added waterfall in the worktop editor, select the edge of the waterfall. The edge options window appears, as shown below:
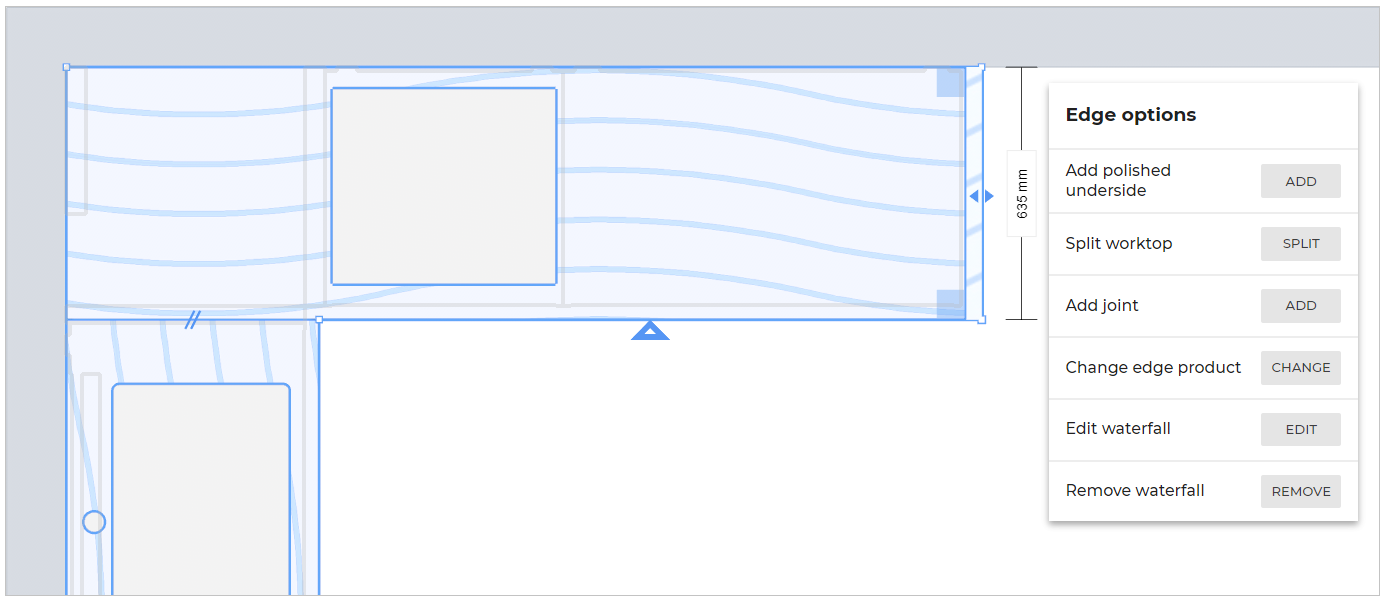
Click the Edit button of the Edit waterfall option, the main worktop view window appears, as shown below:
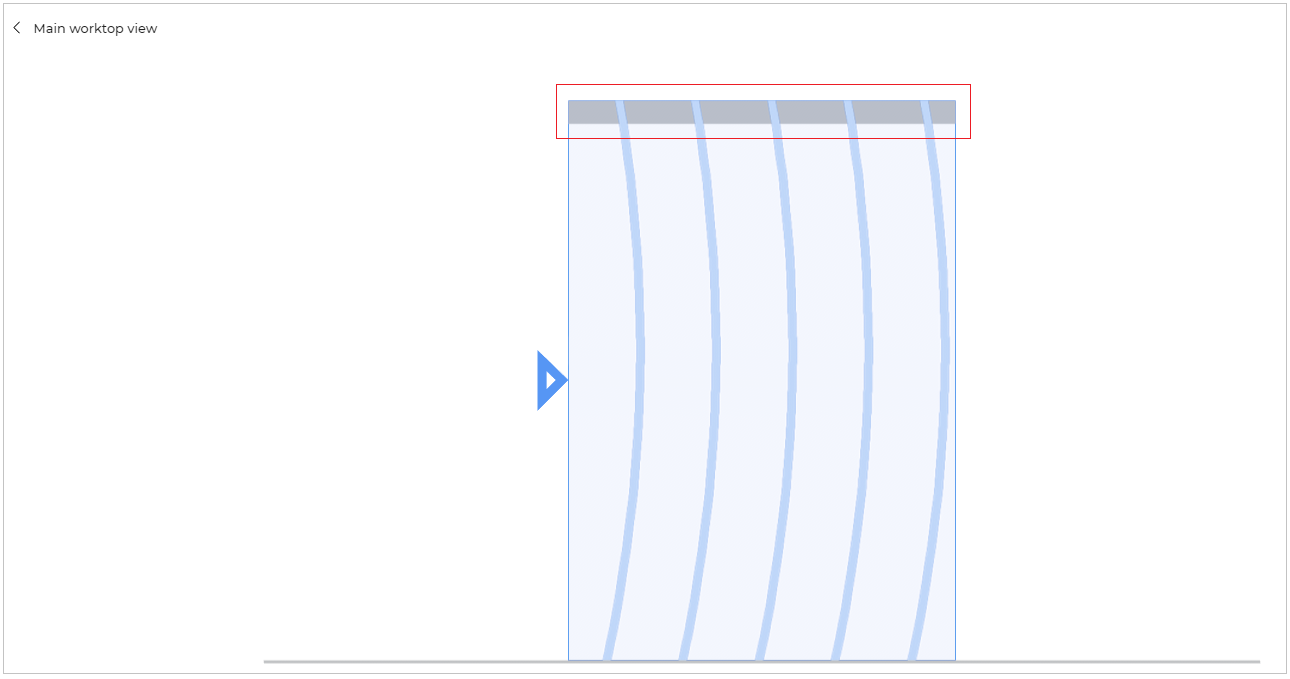
Select the waterfall edge, the edge options appear, as shown below:
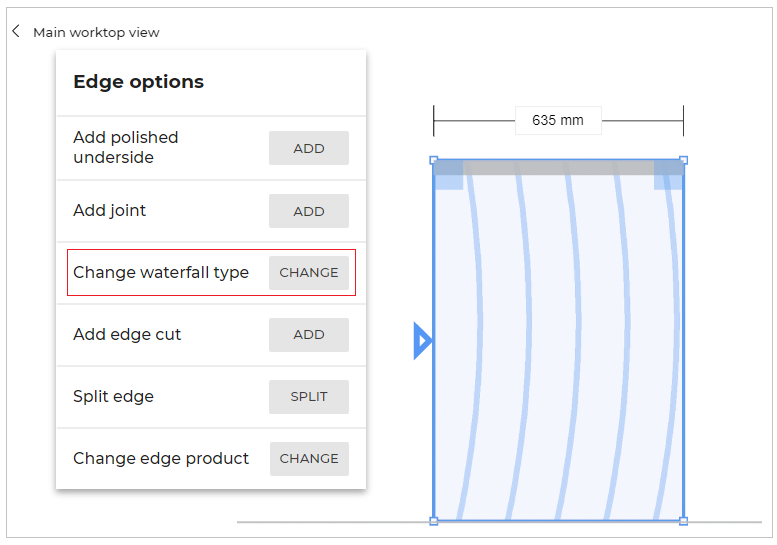
Click the Change button of the Change waterfall type option and choose between Angled/Straight waterfall type.

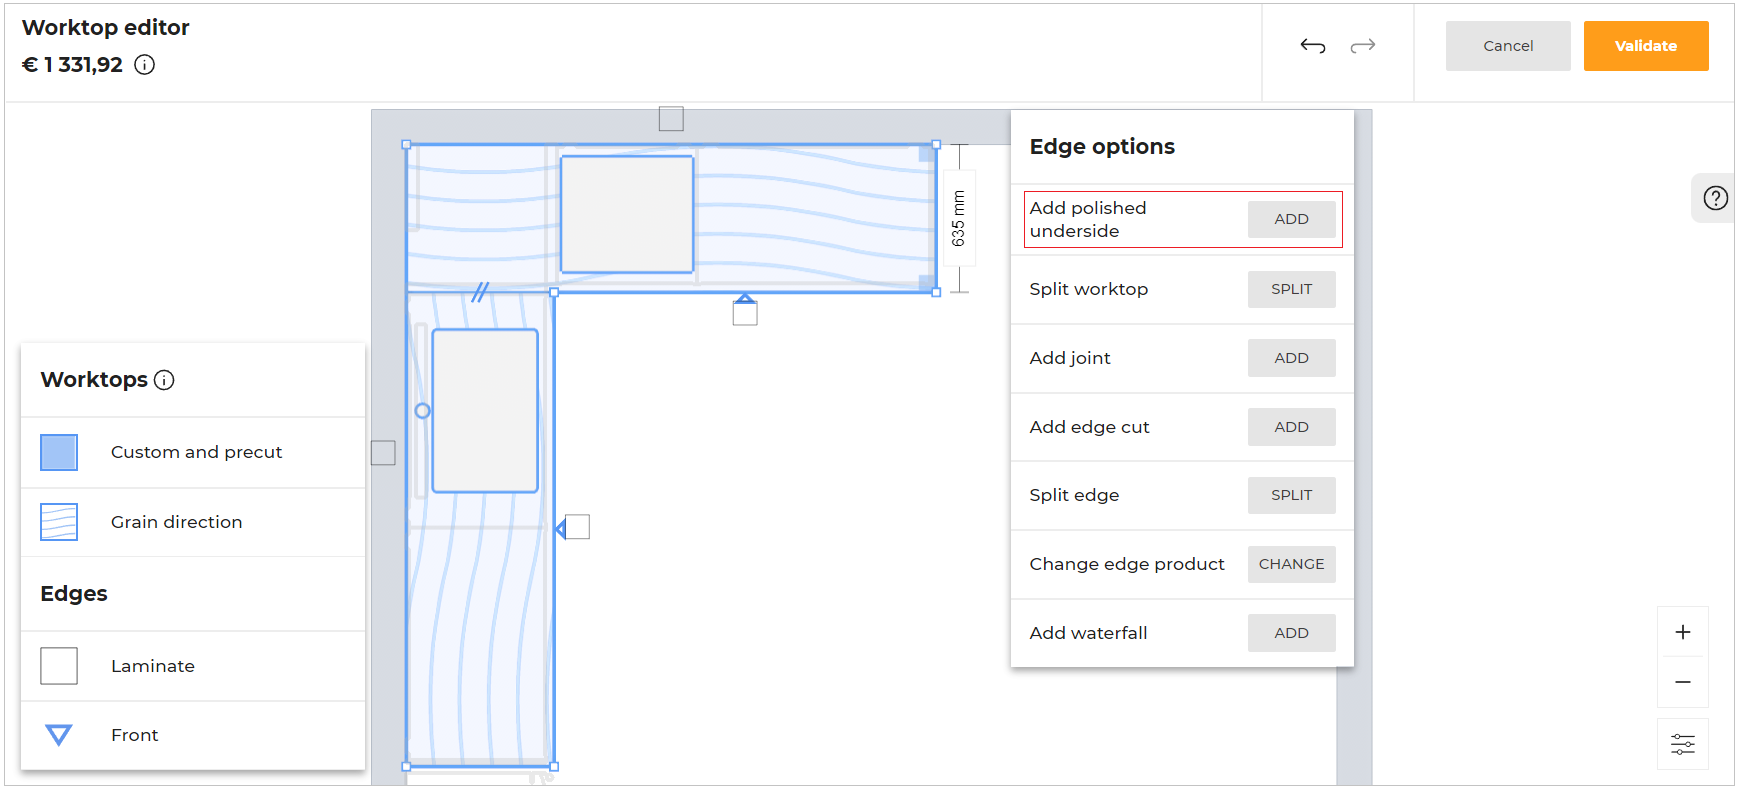
Add a polished underside
You can add the polished underside to the waterfall.
- Select the edge of the waterfall. The Edge options are displayed, as shown below:
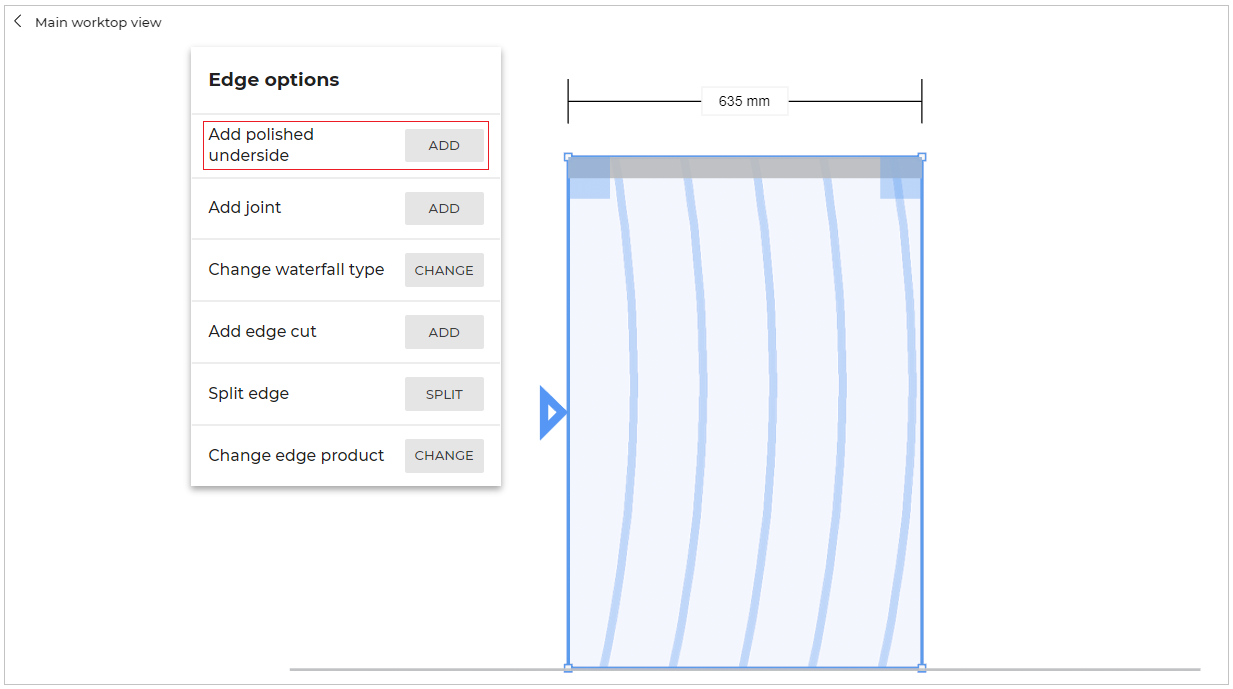
- Click the ADD button of the Add polished underside option.
The option to modify the depth parameter of the Polished underside is displayed, as shown below:

-
Select and enter the depth value to modify the parameter.
-
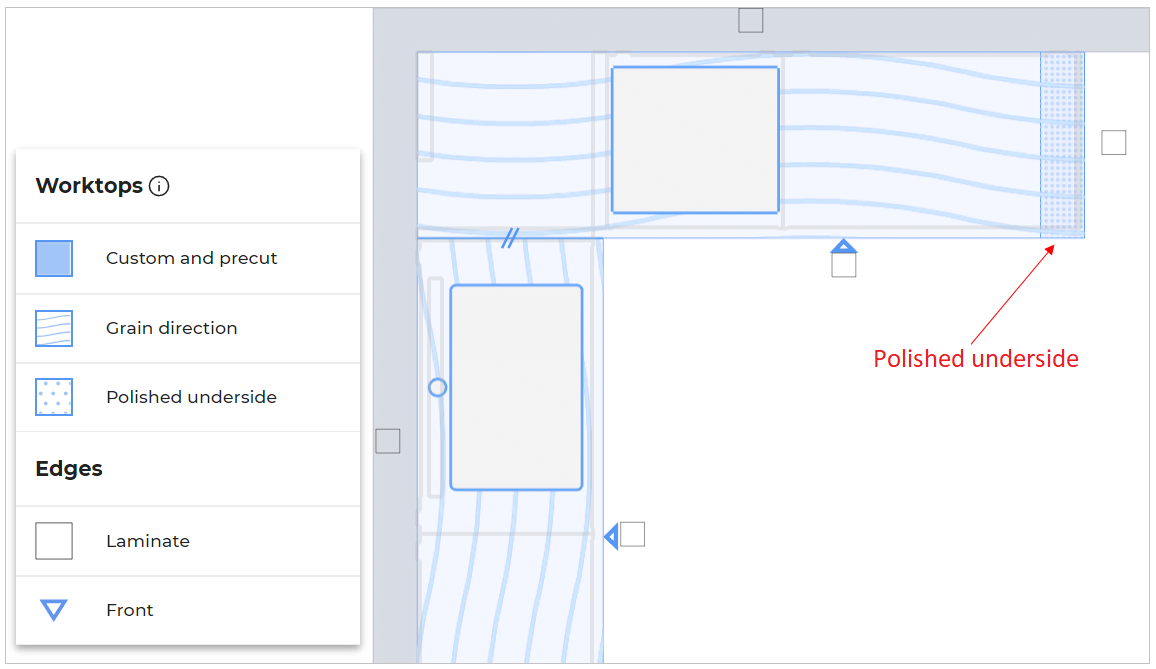
Click the Create button to apply the depth of the polished underside to the waterfall edge, as shown below:
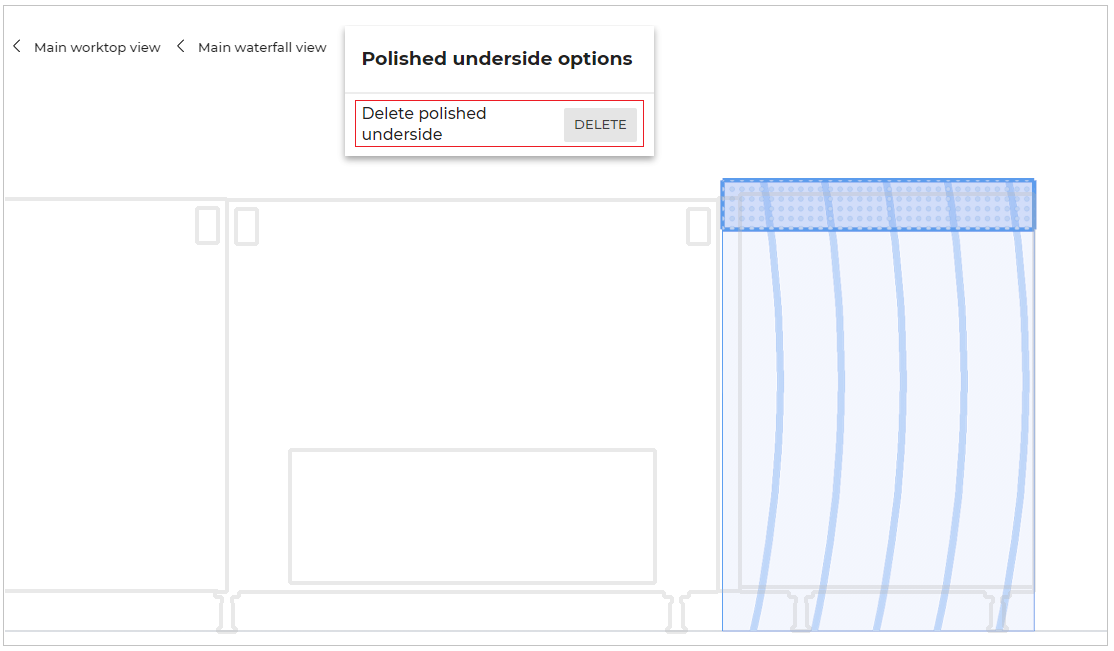
To delete the polished underside:
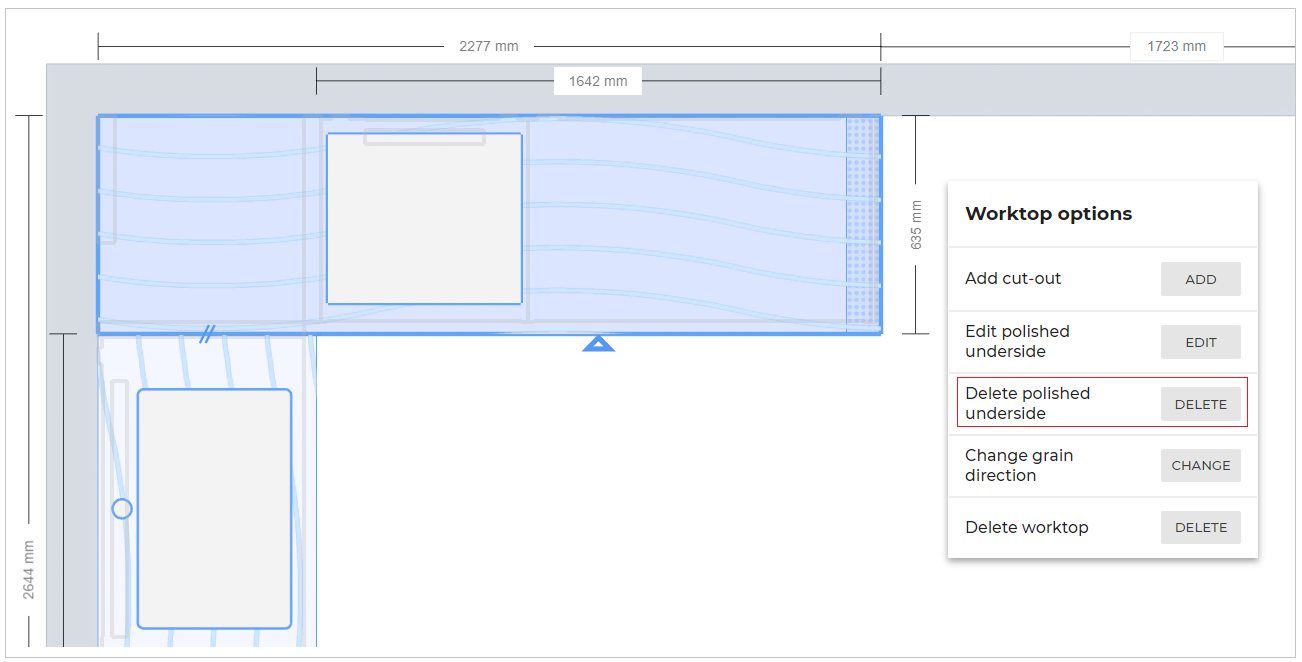
Select the worktop, the Worktop options are displayed, as shown below:
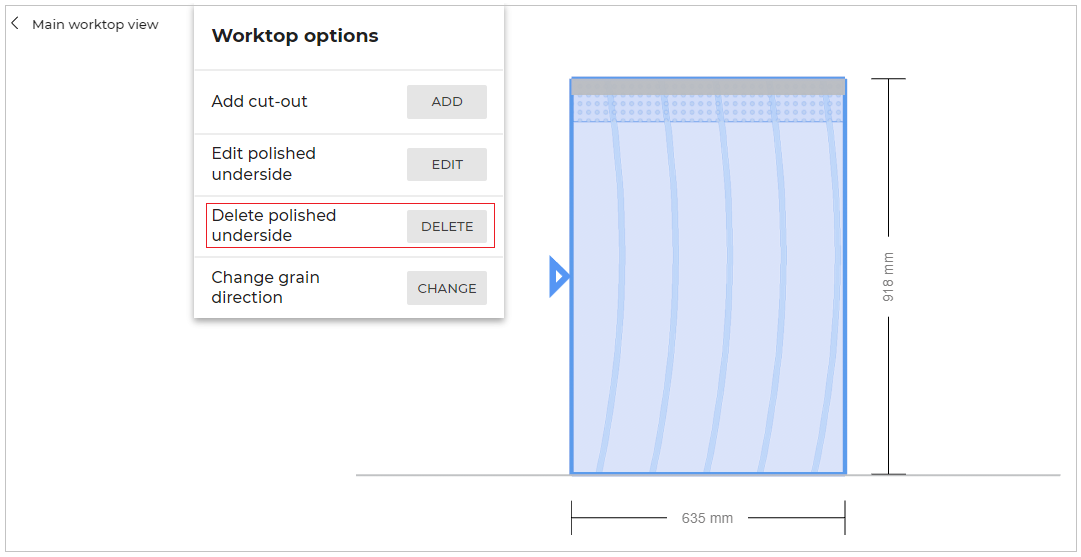
- Click the DELETE button of the Delete polished underside option to delete the polished underside.
Edit polished underside
To edit the polished underside:
- Select the worktop. The Worktop options are displayed, as shown below:
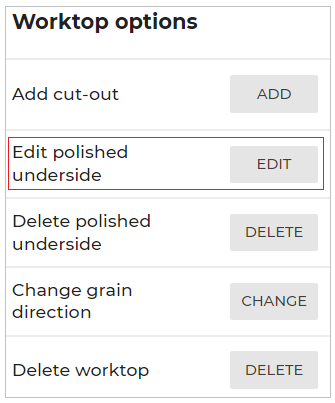
- Click the EDIT button of the Edit polished underside option.
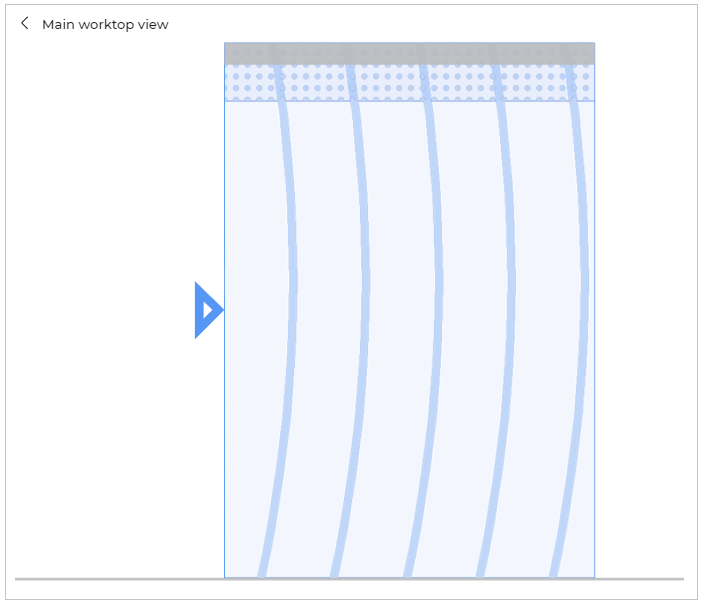
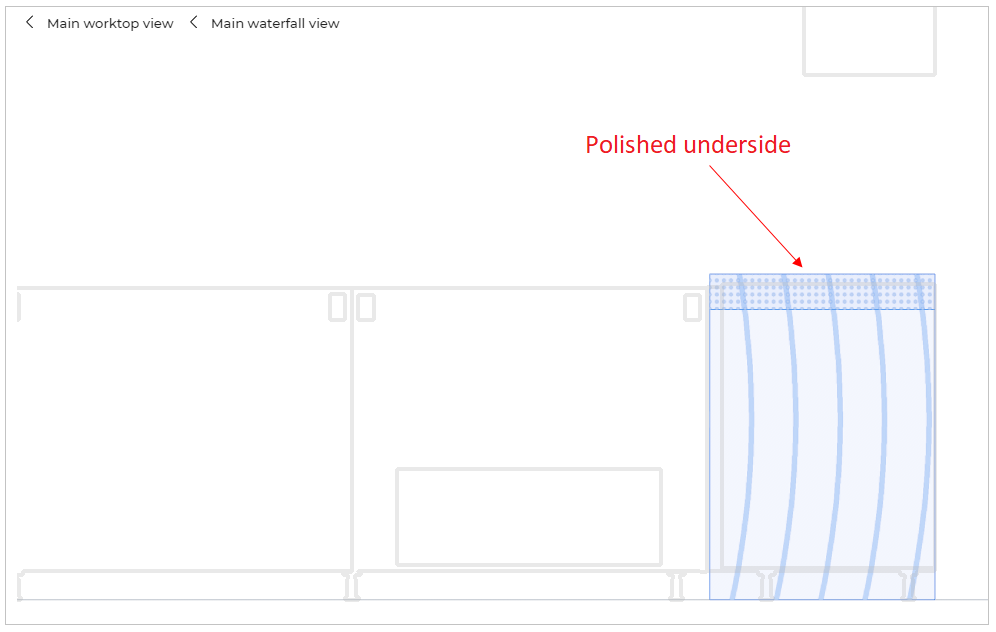
The main waterfall view is displayed, as shown below:
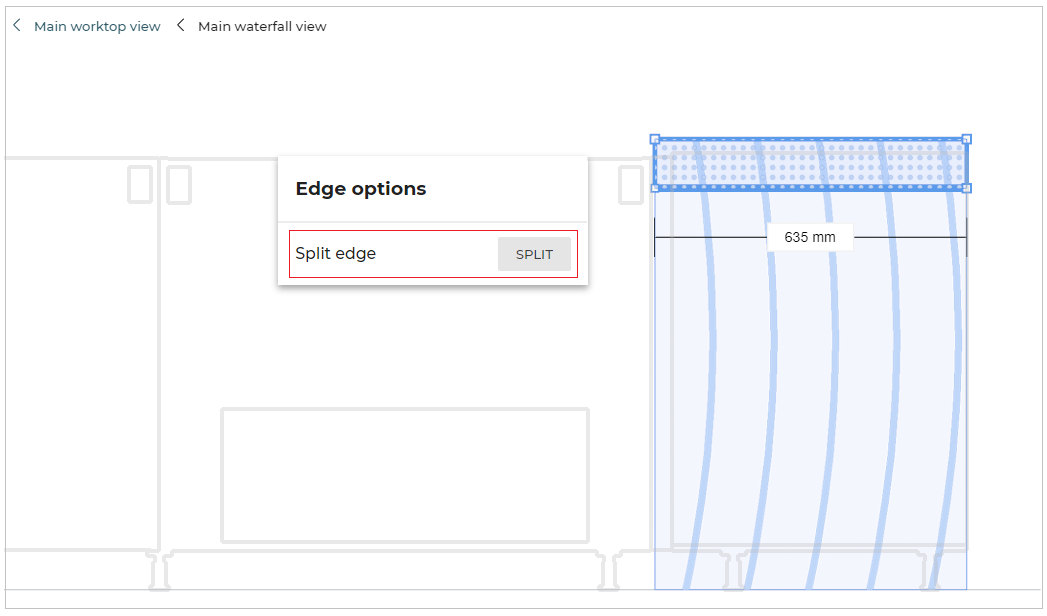
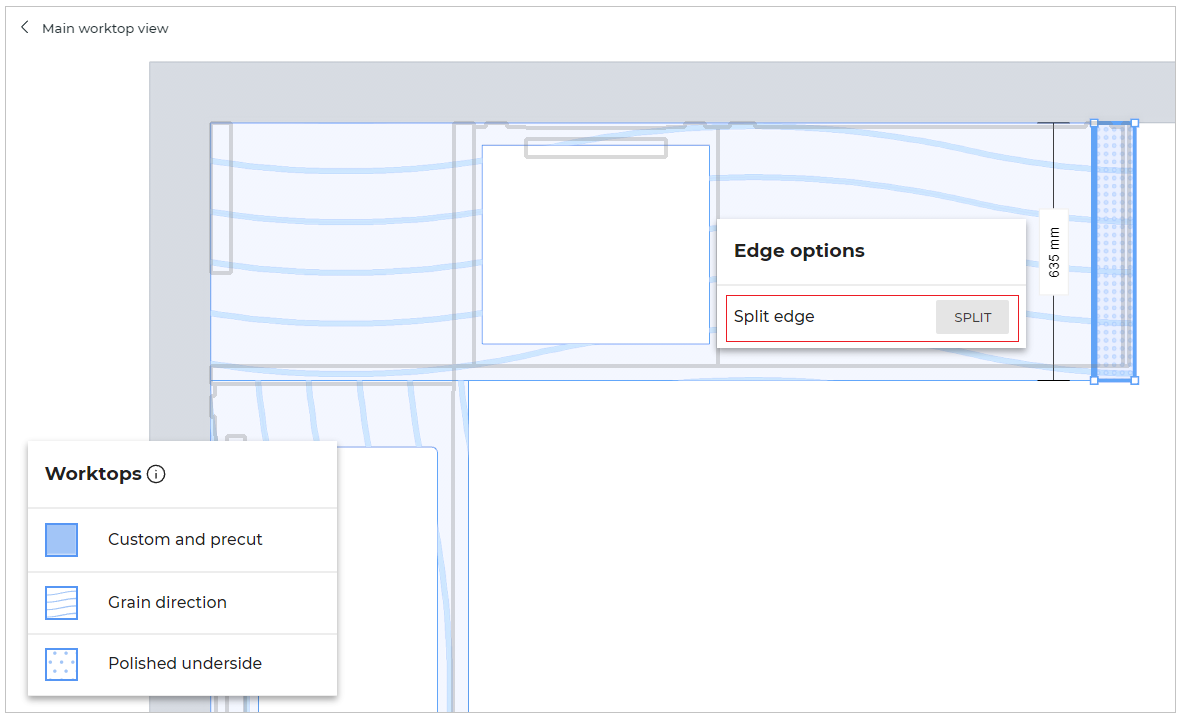
- Select the polished underside edge, the option to split the edge is displayed, as shown below:
-
Click the Split button to split the edge.
-
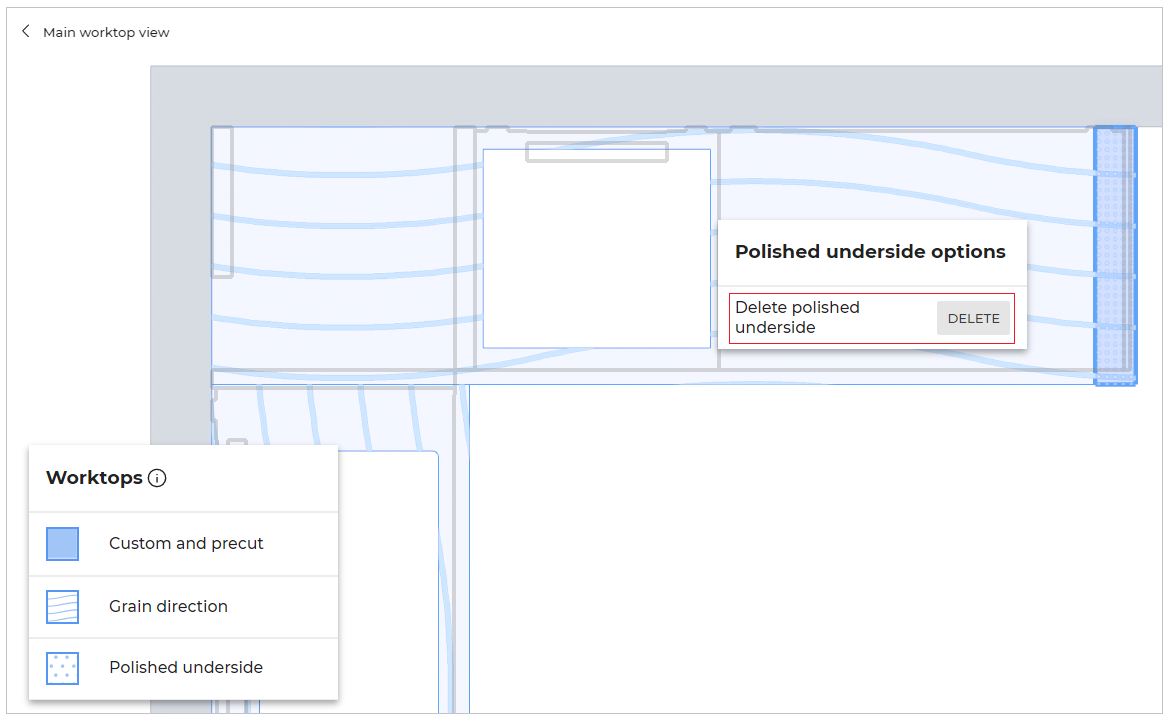
Select the polished area of the waterfall, the option to delete the polished underside is displayed, as shown below:
- Click the DELETE button to delete the polished underside.
- You can also add more than one polished underside areas under a waterfall.
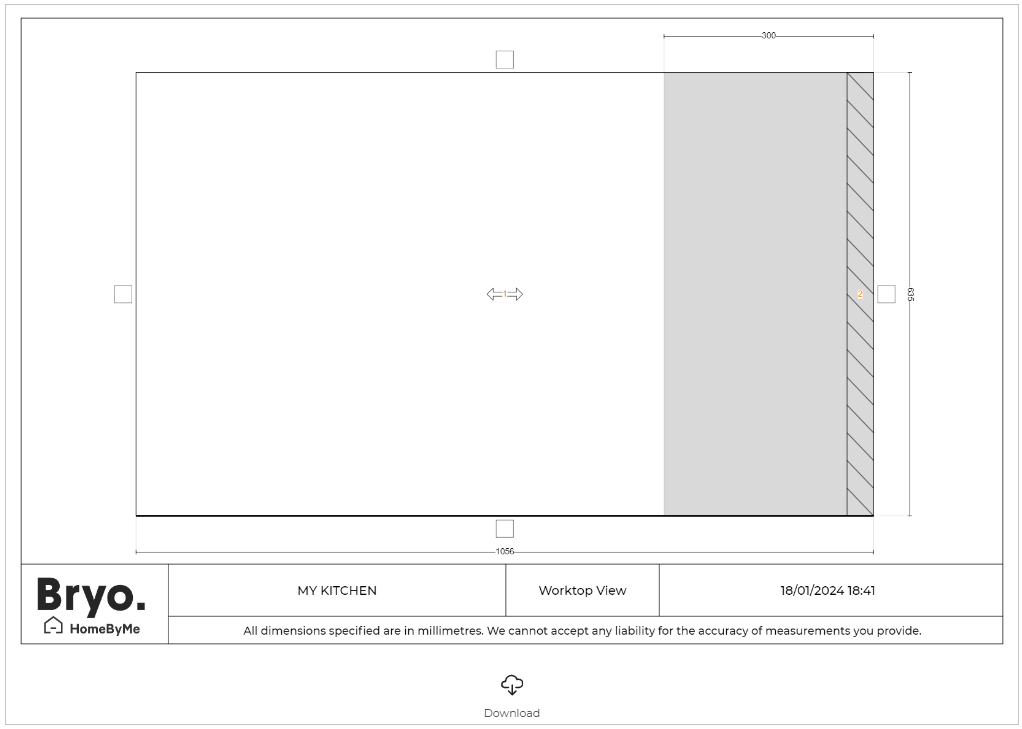
- In the 2D plans of the View images option and Summary step, the polished underside is displayed as shown below:
📌 Both precut and specific custom worktops can be used as a waterfall, there is no restriction.
❗️ An applicative rule (MinDistanceFromWallAndObstacle 🔗) prevents the user from adding a waterfall to the side of the linear that is touching a wall.
Freestanding Worktops
⚙️ Set up: Dimension parameters defaultAltitude 🔗.
You can add a freestanding worktop using the Search option.
These worktops are registered as products in the catalog and there type can be precut or custom.
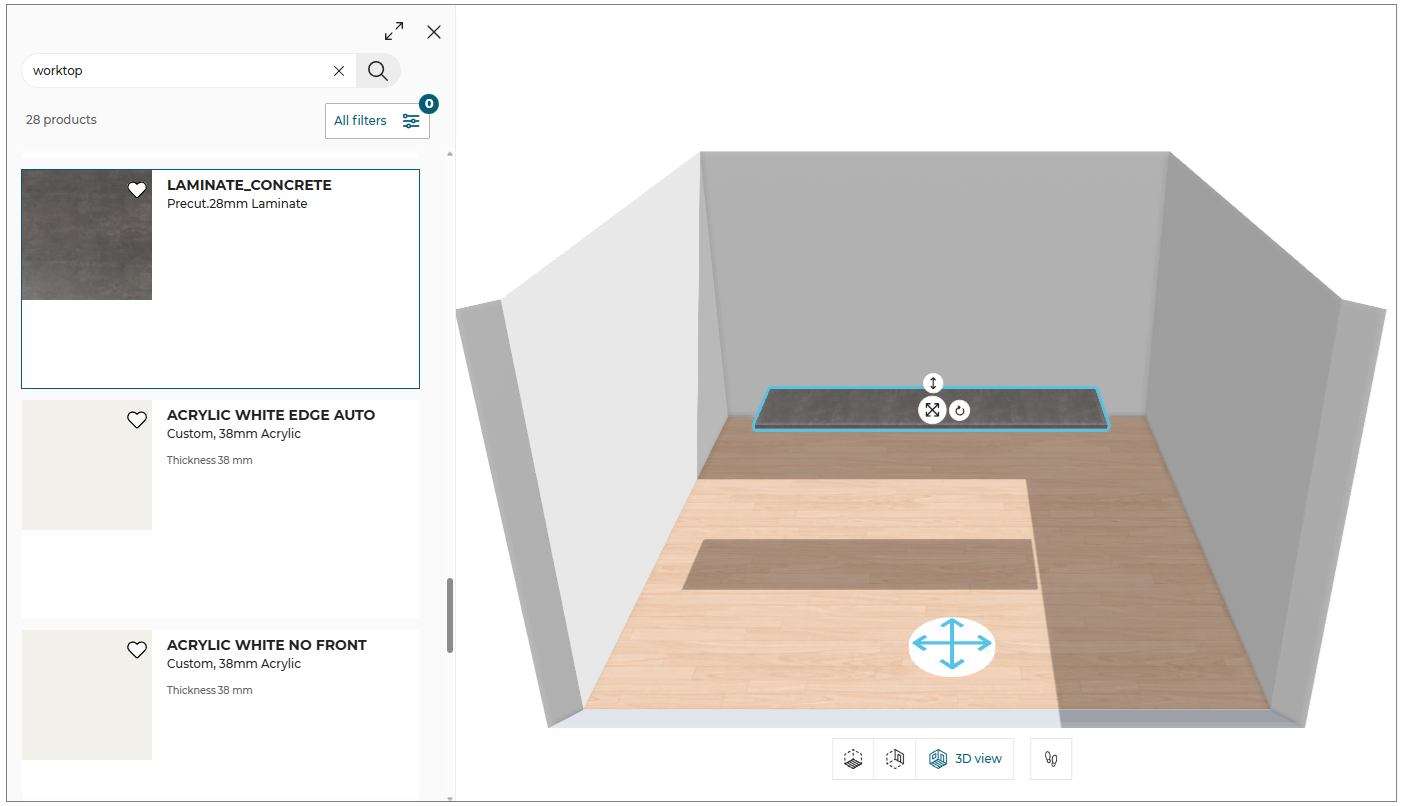
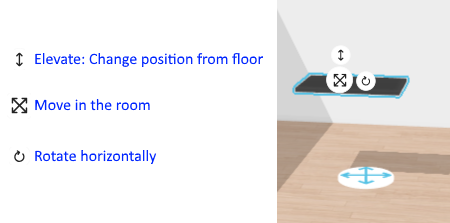
If a freestanding worktop is added to a room, it is possible to manipulate and move the position of the added worktop.
It can be moved horizontally and vertically in the room as well as rotated about its axis.
The customer can change the length (i.e. the width parameter), the depth and the thickness (i.e. the height parameter) of the worktop by specifying values inside the limits set by the Range Manager.
In case of double sided worktop, side selection option will be available.
In case of waterfall worktop, waterfall solution option will be available.
- The duplicate worktop is centrally positioned in the room. The orientation of the duplicate product is consistent with the existing product.
- You can also add the Freestanding worktops in the room by drag and drop them from the catalog, as shown below:
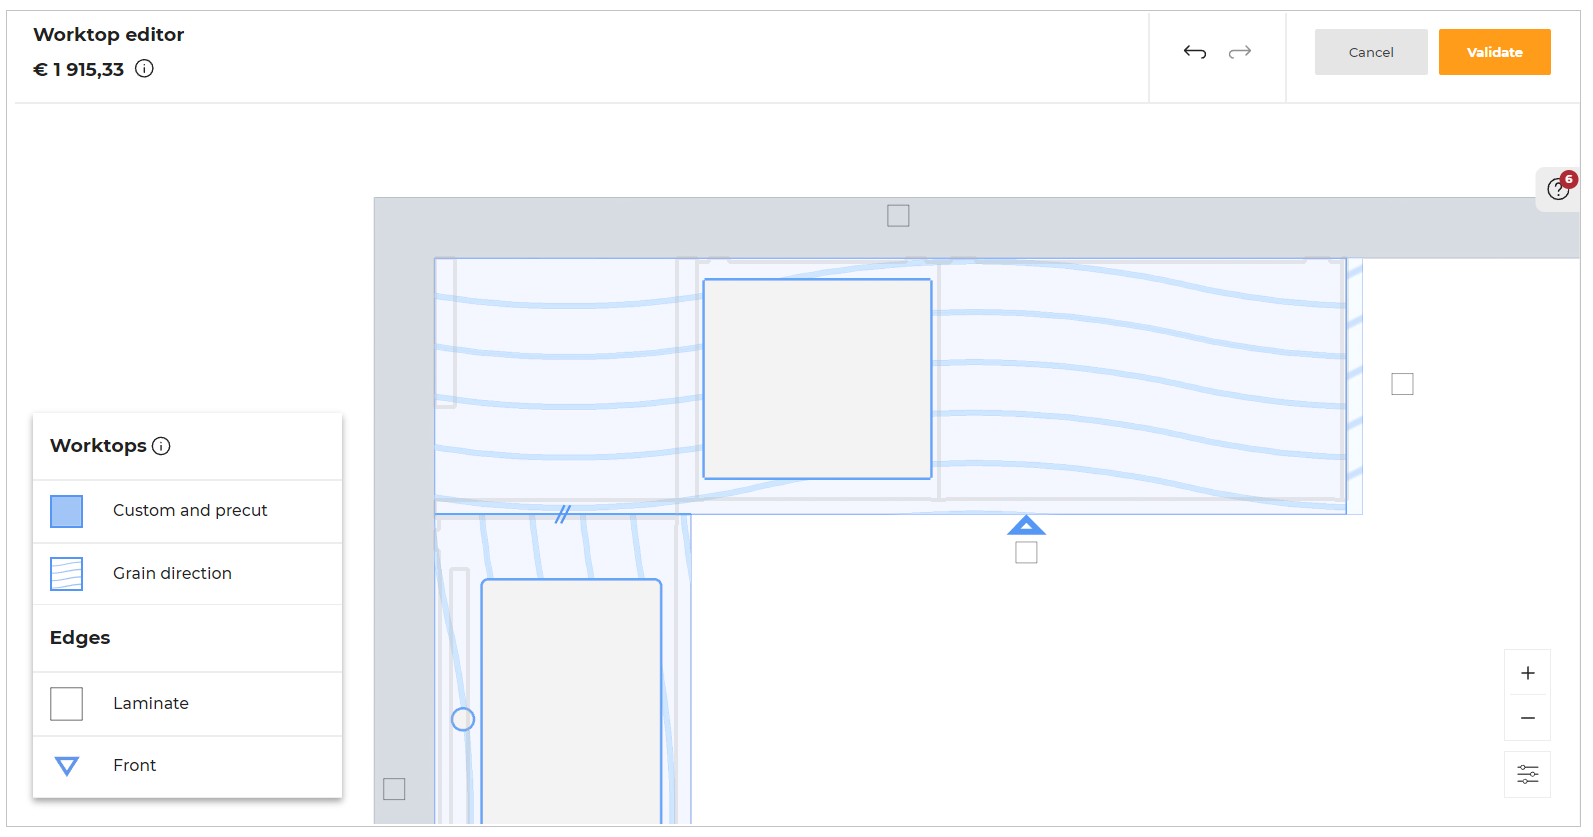
Advanced Options via the Worktop Editor
By clicking the Modify button from the worktop Options the customer accesses the Worktop Editor.

To learn more about worktops and its types, click Learn More about worktops types available in confirmation pop-up.
Information for Wall Panel and Worktop types appear as shown below.
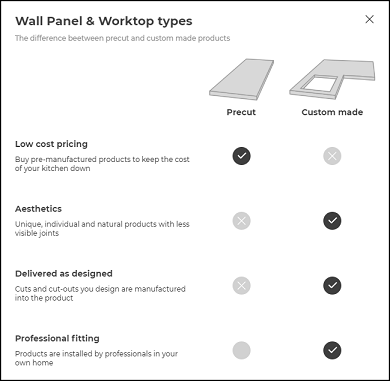
Worktops
Different worktop types available in 2D view of the project:

Worktop types used in the kitchen are displayed in the worktop editor, after enabling Display legend in view mode options.
Illustration Purpose Worktop:
Illustration worktop is a worktop, which user can use for illustration purpose only. This worktop will be available in gray color in the worktop editor.
Custom and precut worktop:
In custom worktop, the joints, cuts, and cutouts need to be added by the user.
In precut worktop, the joints, cuts, and cutouts may be present in the worktop by default.
The Worktop Editor gives a 2D view of the project and allows the customer with:
- Change in worktop dimensions
- Corner option for adding corner cut
- Edge options to:
- Add polished underside
- Split worktop
- Add auto joints
- Merge worktops
- Define joint between two worktops
- Add edge cuts
- Split edge
- Add edge finishing
- Add waterfall/ Remove waterfall
- Change waterfall type
- Worktop options to:
- Add cut out
- Change in grain direction
- Delete the worktop
Change the Dimensions
⚙️ Set up: Application distribution parameter
The customer will be able to change the worktop dimensions by moving the edges or specifying the expected dimension values. These values cannot exceed those defined on the product.
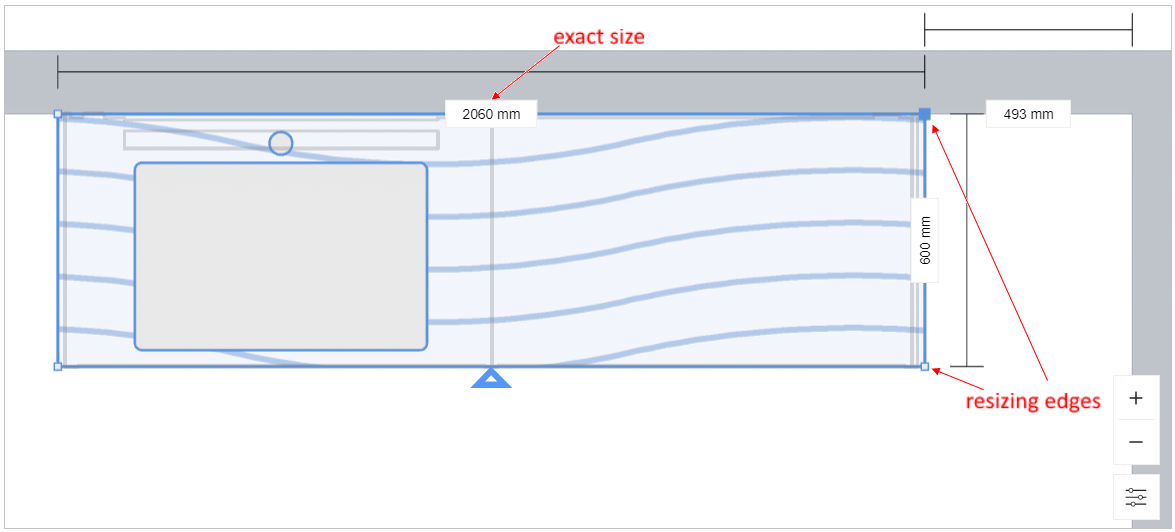

On clicking APPLY LEFT, the worktop shall be adjusted laterally in the left.
On clicking APPLY RIGHT, the worktop shall be adjusted laterally in the right.
On clicking APPLY BELOW, the worktop shall be adjusted longitudinally in the below.
On clicking APPLY ABOVE, the worktop shall be adjusted longitudinally in the above.
Note: If splits are between two collinear worktop edges, no button is displayed.
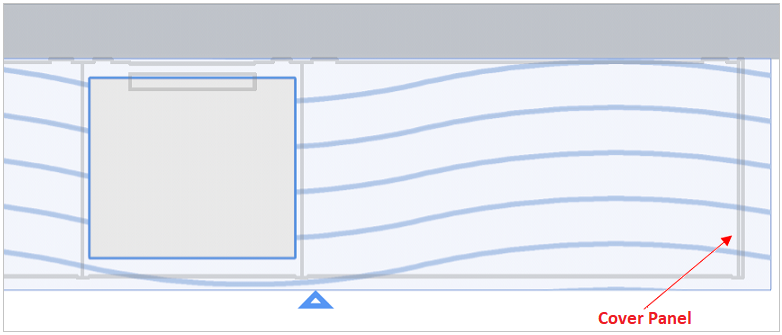
Snap on Cover Panel
The cover panel outlines are displayed in the Worktop Editor, as shown below. While dragging the worktop edge, the user can snap it on the cover panel.
Add a Corner Cut
⚙️ Set up: Parameters for operations 🔗
➡️ See also the Applicative Rules for Worktop Corner Cuts 🔗.
The user can add a cut on the worktop corner by selecting the corner.
To add corner cut:
- Select the corner of the worktop, click ADD button.
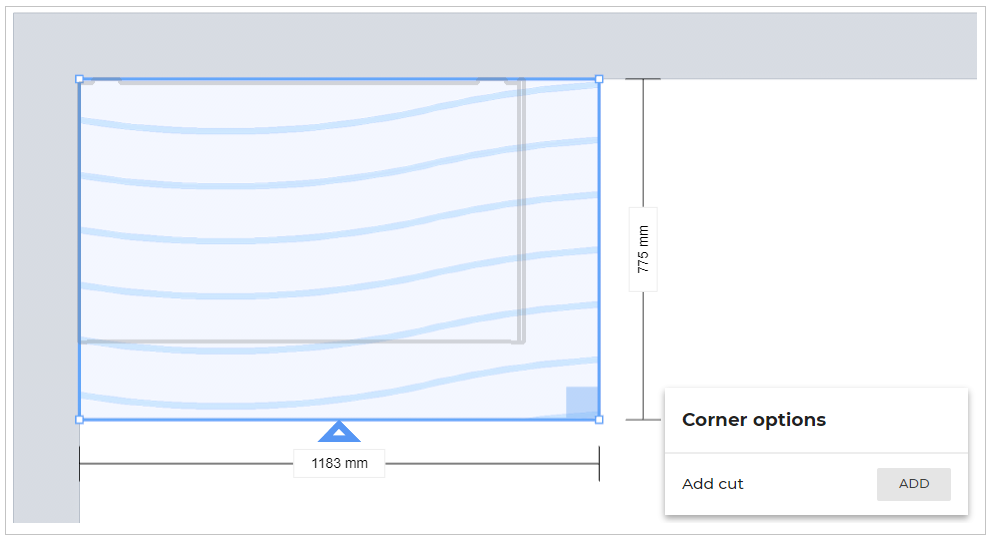
The Corner cut options appear, as shown below:
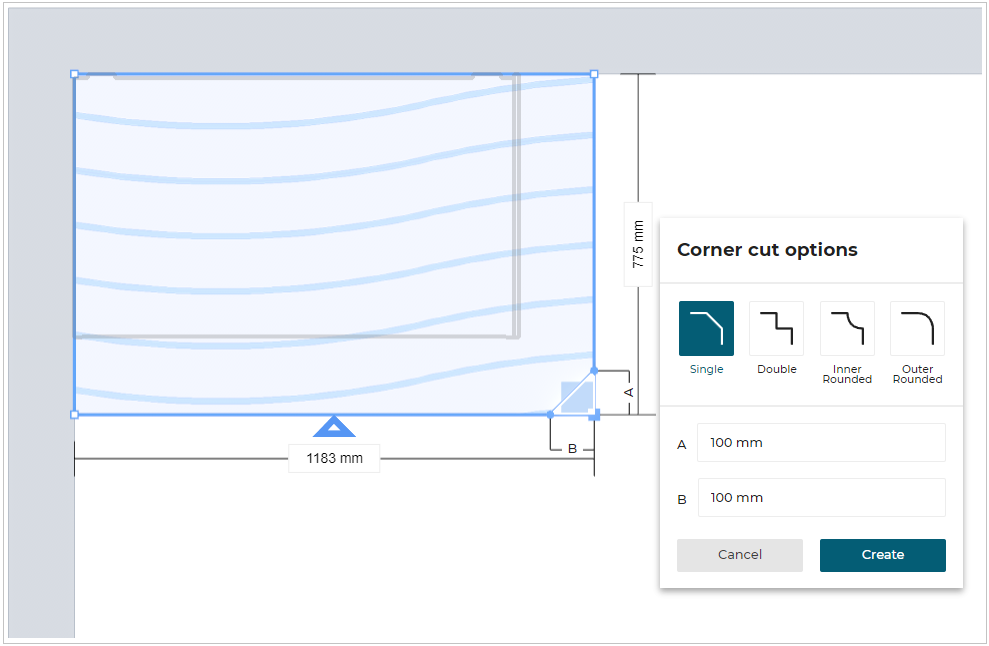
2. Select the type of corner cut and modify the parameters as required.
The type of corner cut can be single, double, inner rounded, or outer rounded.
3. Click Create button, to create a corner cut.
Delete Corner Cut
You can delete the corner cut of the worktop.
- Select the corner cut, as shown below:

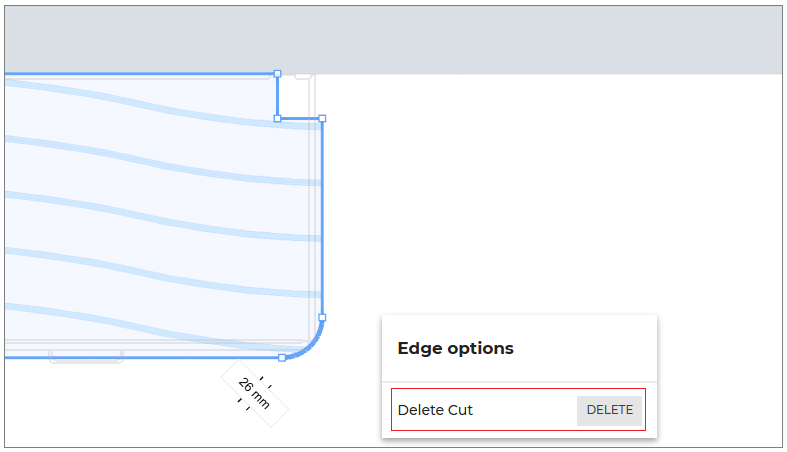
- Click the DELETE button of the Delete Cut option to delete the corner cut.
- If the vertex of the worktop is selected, then a square symbol showing perpendicular angle (i.e. 90 degree) is displayed, as shown above.
- If the edge of the worktop is selected, then the square symbol showing perpendicular angle is displayed on each corner of the edge.
For non-perpendicular sides, the angle values are not displayed.
Converting an Arc to a Straight Line
Case 1: By dragging the arc.
- Hover the pointer on the arc.
- Drag the arc to form a straight line.
While dragging, the arc gets snapped to make a straight line.
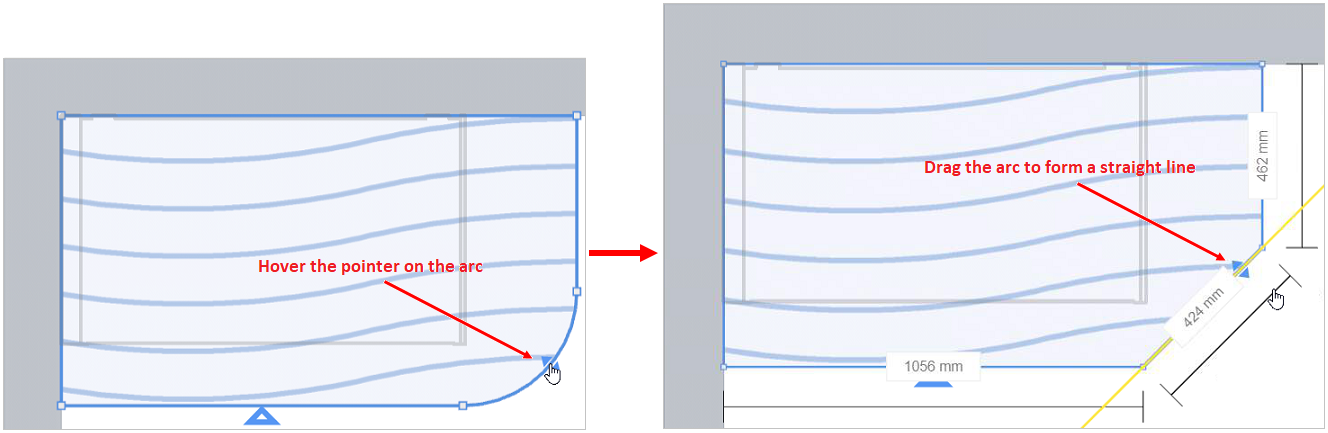
An arc created by the corner cut or edge cut can be converted to a straight line using this method.
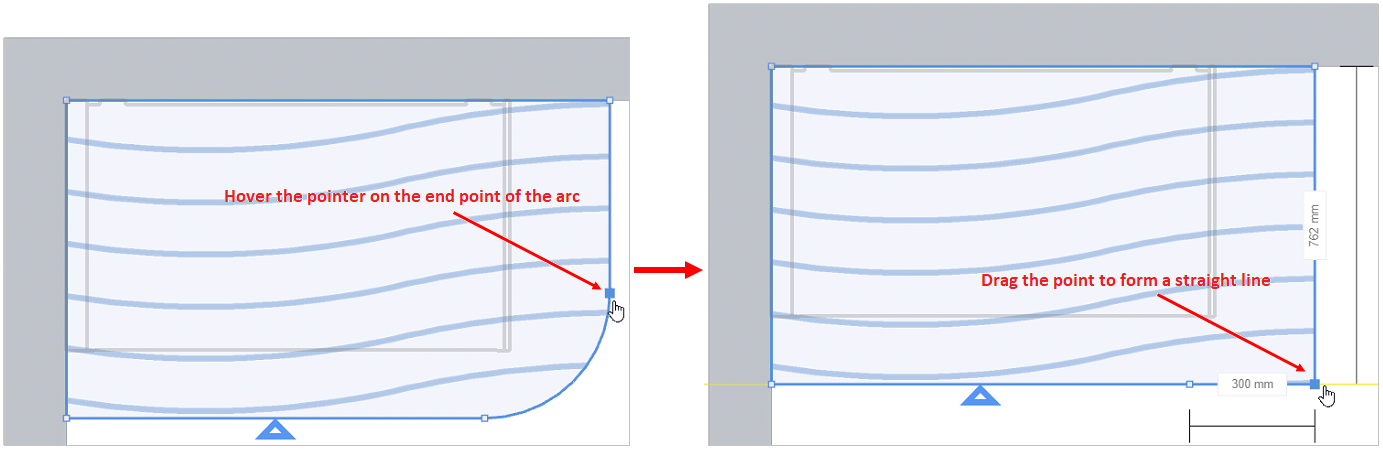
Case 2: By dragging the end point.
- Hover the pointer on the end point of an arc.
- Drag the end point, to make the point collinear to its adjacent egde.
While dragging the end point, it gets snapped collinear to adjacent edge.
Add a polished underside
You can add the polished underside to the worktop.
- Select the edge of the worktop. The Edge options are displayed, as shown below:
- Click the ADD button of the Add polished underside option.
The option to modify the depth parameter of the Polished underside is displayed, as shown below:
-
Select and enter the depth value to modify the parameter.
-
Click the Create button to apply the depth of the polished underside to the worktop edge, as shown below:
To delete the polished underside:
Select the worktop, the Worktop options are displayed, as shown below:
- Click the DELETE button of the Delete polished underside option to delete the polished underside.
Edit polished underside
To edit the polished underside:
- Select the worktop. The Worktop options are displayed, as shown below:
- Click the EDIT button of the Edit polished underside option.
The main worktop view is displayed, as shown below:
- Select the polished underside edge, the option to split the edge is displayed, as shown below:
- Select the polished worktop, the option to delete the polished underside is displayed, as shown below:
- Click the DELETE button of the Delete polished underside option to delete the polished underside.
- You can also add more than one polished underside areas under a worktop.
- In the 2D plans of the View images option and Summary step, the polished underside is displayed as shown below:
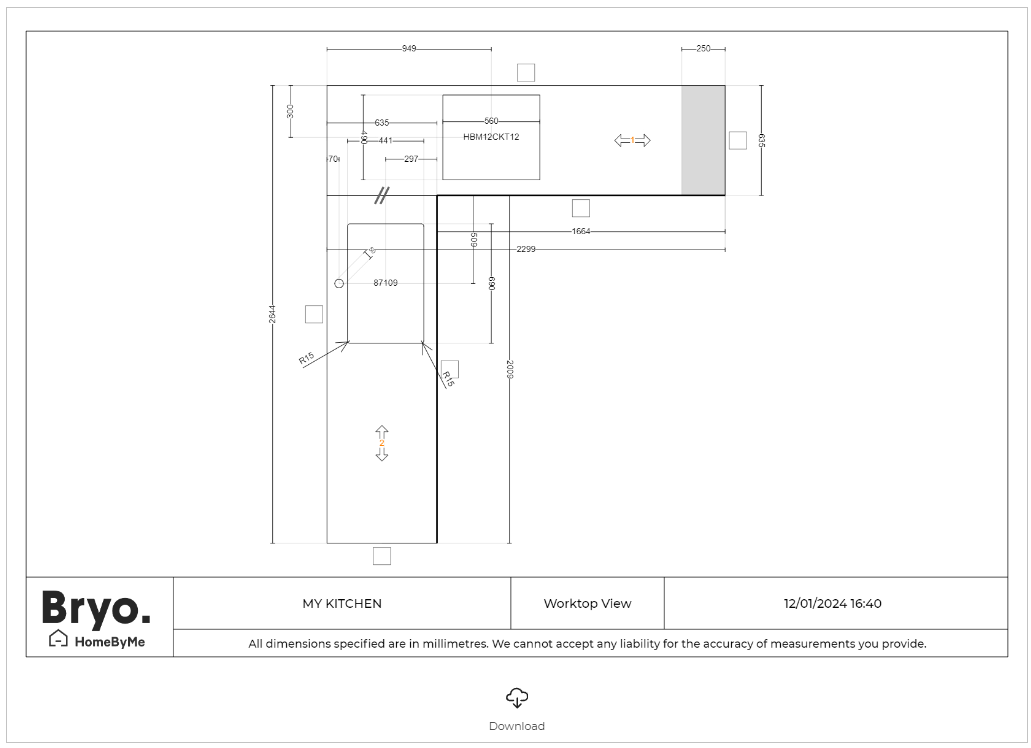
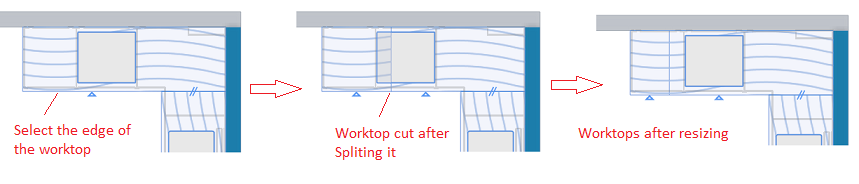
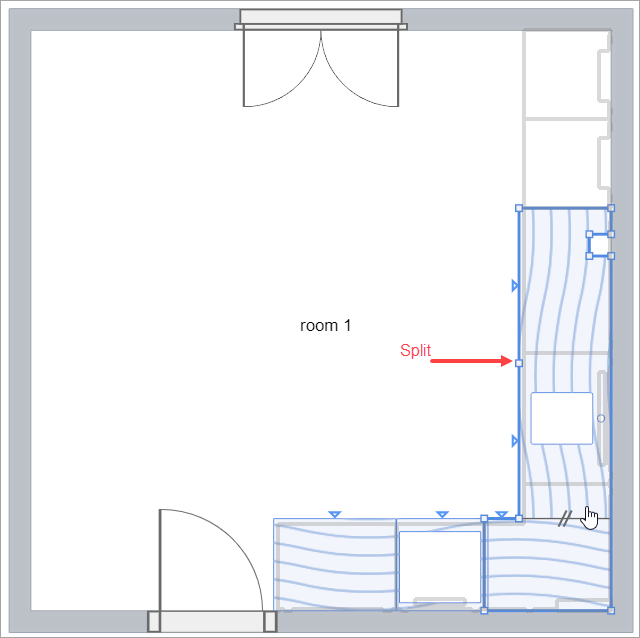
Split the Worktop
- Select cabinet in the linear.
- Open worktop editor through Edit > Worktop > Options > Modify.
- Select the straight edge of the worktop as shown below & click Split button of the Split Worktop option.
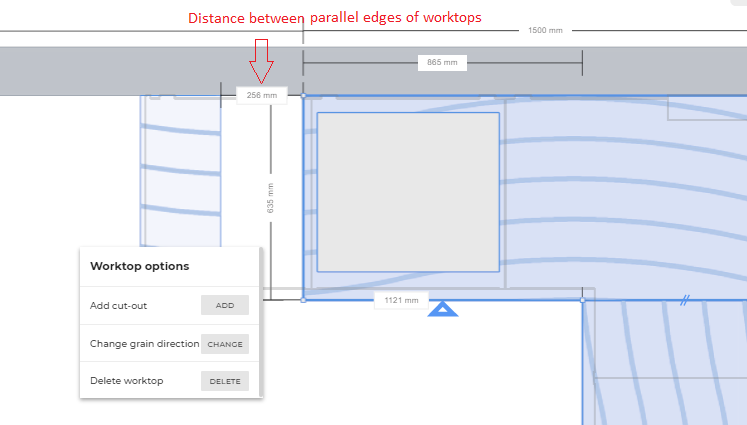
This will split the worktop at the center of the selected edge. Each of these worktops can be modified separately similar to any other worktop. You can change the size of each worktop by dragging the edge or modifying the dimensions of the edge.

- Resize each worktop by dragging its edge.
After resizing, the distance between the parallel edges of the two worktops is displayed after selecting one of the worktops.
Illustrations:
-
Split and resize the worktop:
-
The distance between the parallel edges of the two worktops:
- Select one of the worktops created after the split and replace it with a different worktop using Edit > Replace option.
A pop-up to inform the user that the modification done on the worktop previous to replace will be deleted if the application distribution parameterresetCustomizationis set to true.
Click Yes to replace the worktop.
Resize the worktop after replace if necessary in Worktop Editor.
Illustration:

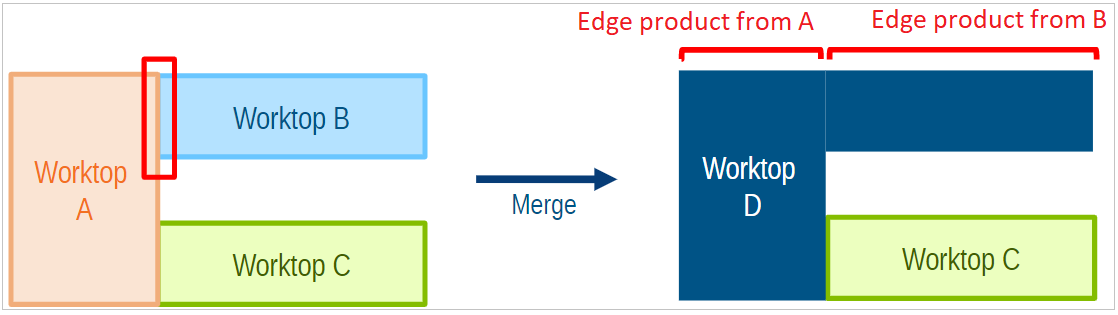
Merge Worktops
Two worktops can be merged if:
- There is an edge from another worktop that is in contact with this one, even partially.
- Those 2 edges are perfectly parallel.
- The 2 worktops are the same product (material, thickness, etc.).
- The 2 worktops are at the same height.
- Select one of the worktops and open Worktop Editor through Edit > Modify.
- To merge worktops, select the edge that satisfies the first two conditions mentioned above and click Merge.
Illustration:
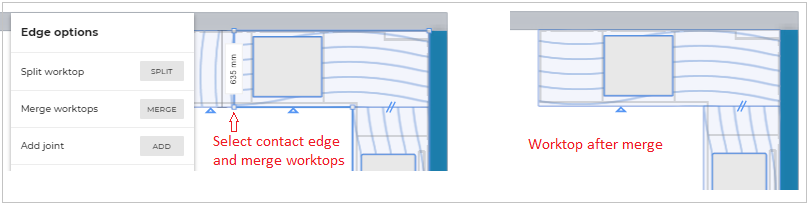
The edge product of both the worktop is retained after the merge.
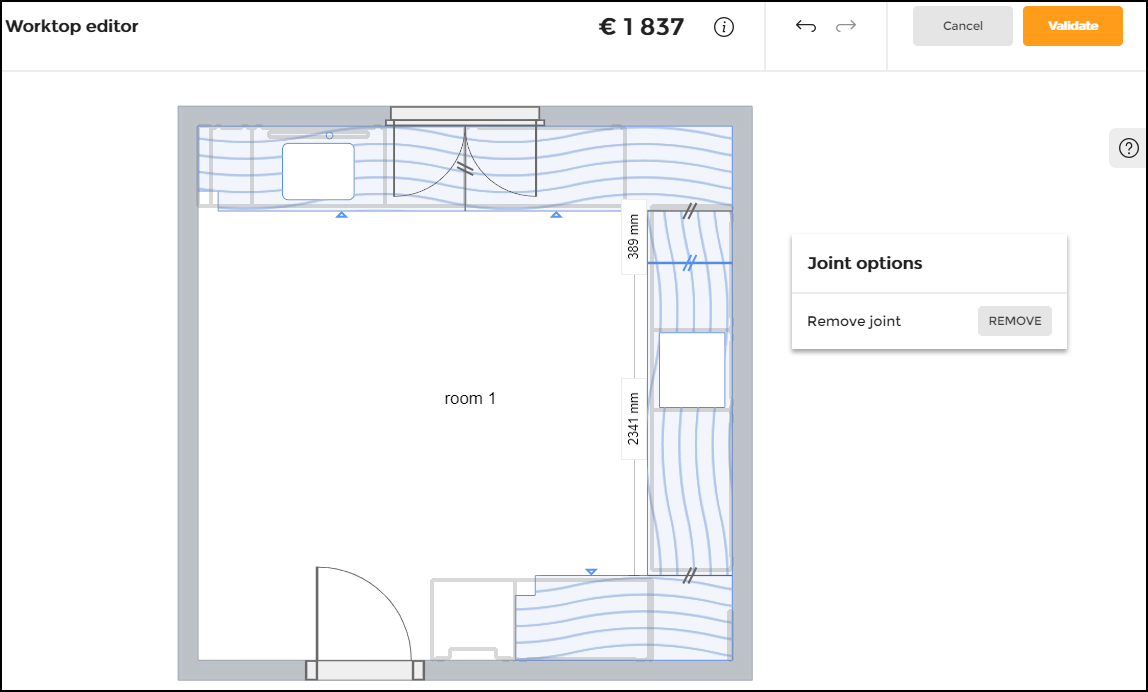
Add Joint
⚙️ Set up: 'cornerJointPossible' and other joint parameters
➡️ See also the Applicative Rules for Worktop Joints 🔗.
It is used to divide the worktop into two parts. The two parts act as different worktops and can be customized separately.
Click Add next to Add joint.
Joint is added to the worktop editor as shown below.

The joint can be positioned by dragging it to left and right.
To remove the joint, click the joint.
In the Joint options, click Remove.
Automatic Straight Joints
While adding the diagonal corner worktop to the cabinet, straight joints are automatically added to the left and right sides of the corner worktop.
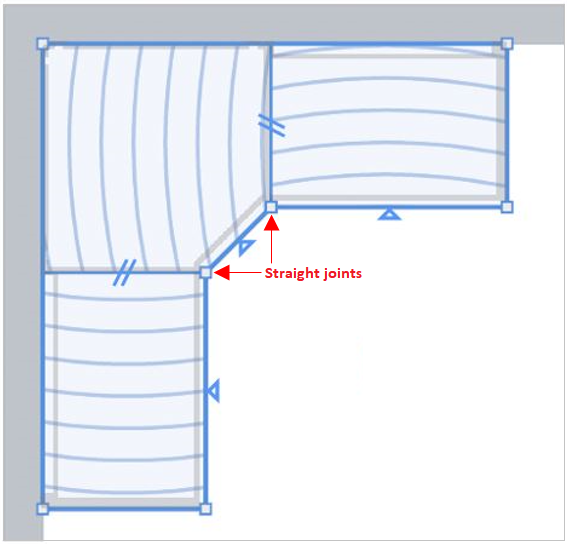
- On each side of the diagonal corner cabinet, the automatic straight joints are perpendicular to the straight boards.
- The grain direction of the worktop board placed on the diagonal corner cabinet is aligned with the worktop front.
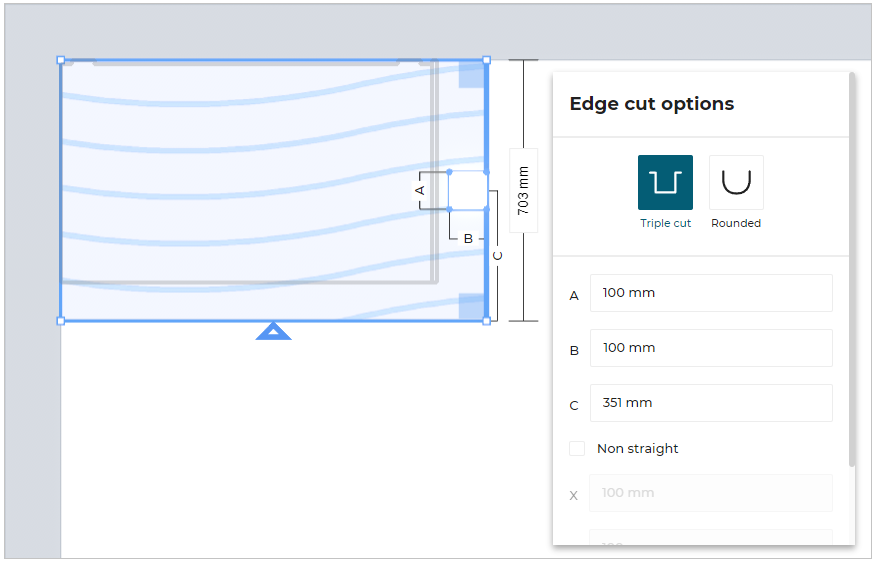
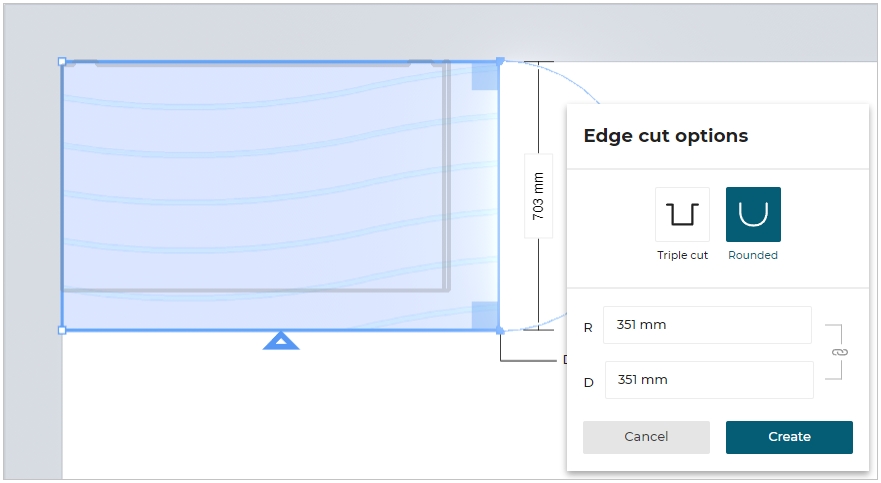
Add an Edge Cut
⚙️ Set up: Parameters for operations 🔗
➡️ See also the Applicative Rules for Worktop Edge Cuts 🔗.
The user can add an edge cut on the worktop by selecting the edge of the worktop.
To add an edge cut:
- Select the edge of the worktop, click ADD button from the Add edge cut option.
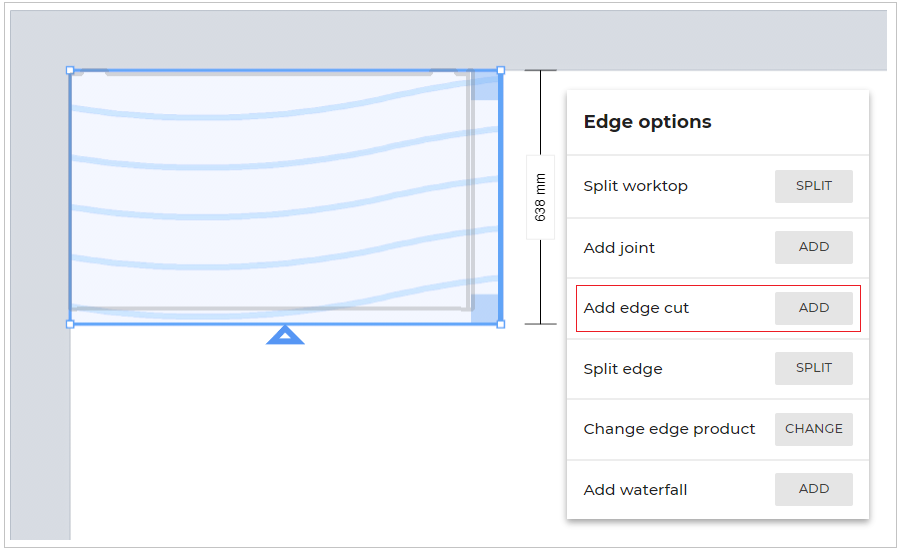
- The Edge cut options appear, as shown below:
- Triple Cut Edge Option:
Modify the values according to the requirement, click Create.
- Rounded Cut Edge Option:
The user can modify the dimension of the arc by specifying the values for radius or the depth of the arc.
The values of the radius and depth of the arc dimension are inter-connected, i.e. if you modify the radius value, the depth of the edge cut changes accordingly.
Select Rounded Edge Cut option and modify the required dimension of the arc, click Create.
Split Edge
The customer will be able to add split to the worktop edge by selecting the "split" from edge options. This option splits the worktop in two halves of equal length.
The customer can create multiple splits and perform operations accordingly.
See also the Applicative Rules for Worktop Split Edge 🔗
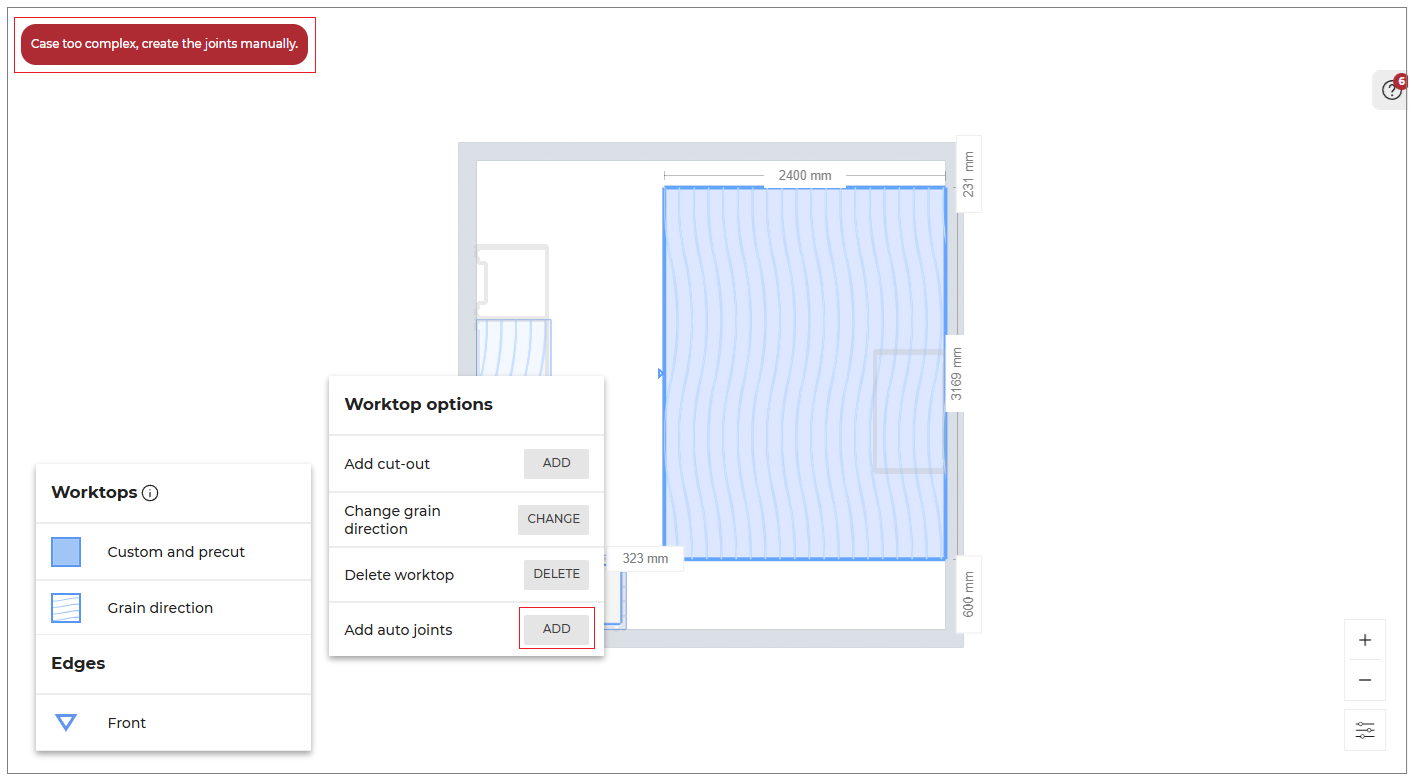
Add Auto Joints
You can automatically split your worktops by clicking the Add auto joints button within the Worktop Editor.
- Select the worktop, the Worktop options are displayed, as shown below:
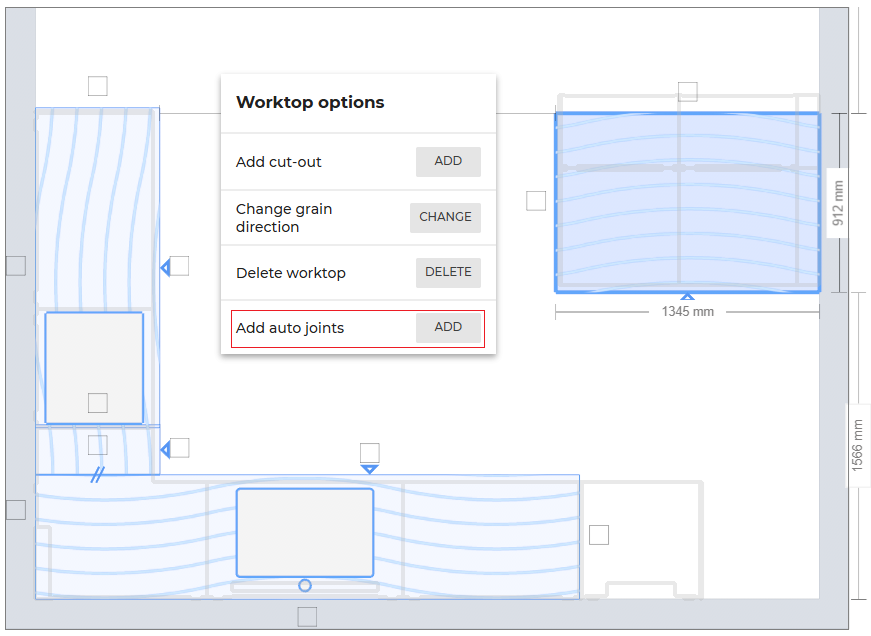
- Click the ADD button of Add auto joints option.
Case:1. If the selected worktop doesn't require a joint, a No joints are necessary on this board notification is displayed, as shown below:

Case:2. If the selected worktop require a joint, then the auto joint is applied to the worktop, as shown below:
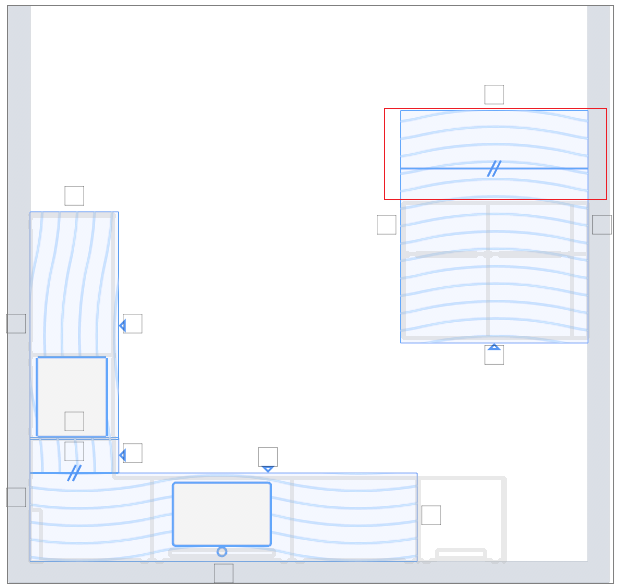
Case:3. If the automatic joint creation is not possible due to the complexity of the selected worktop dimensions, you will be notified with Case too complex, create the joints manually, as shown below:
Add Edge Finish
⚙️ Set up: 'edgeCompatibility' and edge parameters :
parallelToGrain,'perpendicularToGrain'andotherGrainDir.
➡️ See also the Applicative Rules for Worktop Edge 🔗.
For custom type worktops, you can choose how the edge of each worktop is finish.
Different edge product have different edge symbols.
Based on the worktop edge parameters:
a. perpendicularToGrain specifies the worktop edge is applied perpendicular to the grain direction.
b. parallelToGrain specifies the worktop edge is applied parallel to the grain direction, and
c. otherGrainDir specifies the worktop edge is applied neither parallel nor perpendicular.
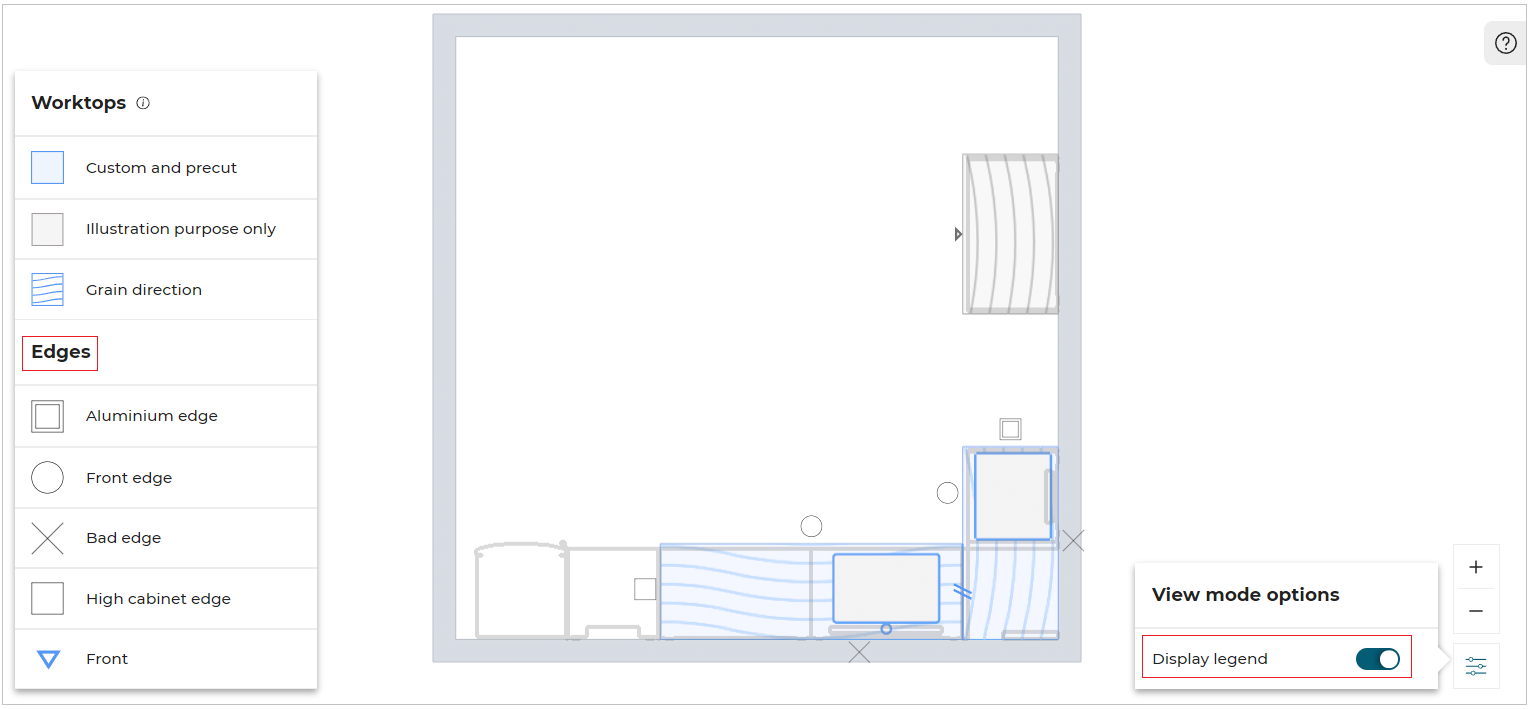
Edge Legend
The edge products and edge symbols are displayed in the Edges after enabling the Display legend in View mode options.
Below are the cases of correct edge configuration for custom worktops:
nonVisibleEdgeFinish- If the edge of the worktop is non-visible, then the default edge productnonVisibleEdgeFinishis applied to the non-visible edges.frontEdgeFinish- If the edge of the worktop is front edge, then the default edge productfrontEdgeFinishis applied to the front edge.backEdgeFinish- If the edge of the worktop is the back of the cabinet worktop, then the default edge productbackEdgeFinishis applied to the back of the cabinet worktop.adjacentEdgeFinish- If the edge of the worktop is adjacent to the high cabinet, then the default edge productadjacentEdgeFinishis applied to the adjacent side.
If none of the above conditions are met, then the edge finish defined in edgeCompatibility is applied.
Conditions for Edge Legend:
- If edge finishes can be set to a worktop, only then legend and symbols are displayed. If not, the legend option is deactivated and cannot be activated.
- The legend displays only the symbols visible on the current worktop.
- If an edge finish product does not have a symbol, it does not appear in the legend.
- If an edge finish product does not have a description, it appears in the legend, with an empty line.
- An edge finish product appears only once in the legend.
- If two edge finish have the same description, only one will appear in the legend.
Edge Products
In specific cases, the customer can add an edge finish product to the selected edge.
Compatible edge products are listed on worktop product level via the 'edgeCompatibility' parameter.
To change or remove the edge product, select the edge of the worktop, Edge options window will appear as shown below:
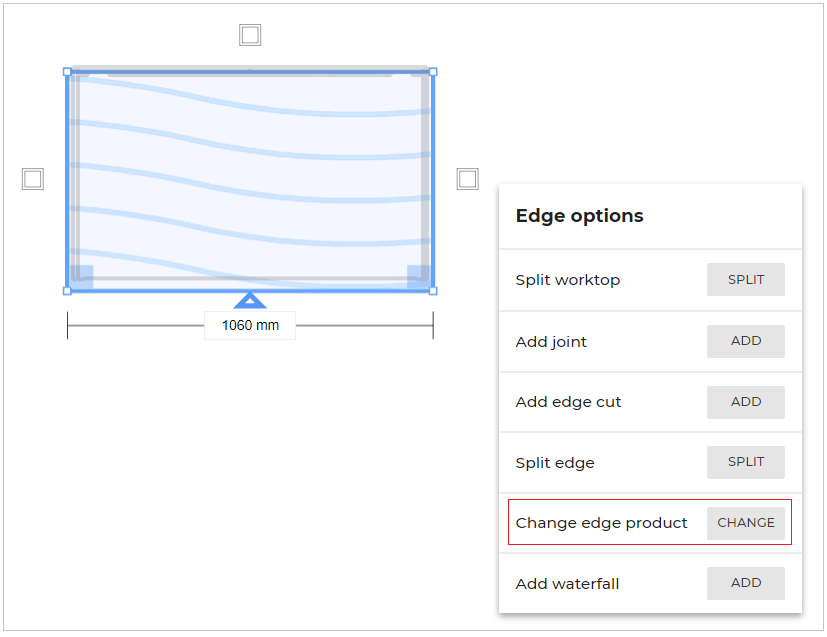
From the Edge Options window, click CHANGE to change the edge product.
You can choose the edge product from the drop down option of Choose a reference.
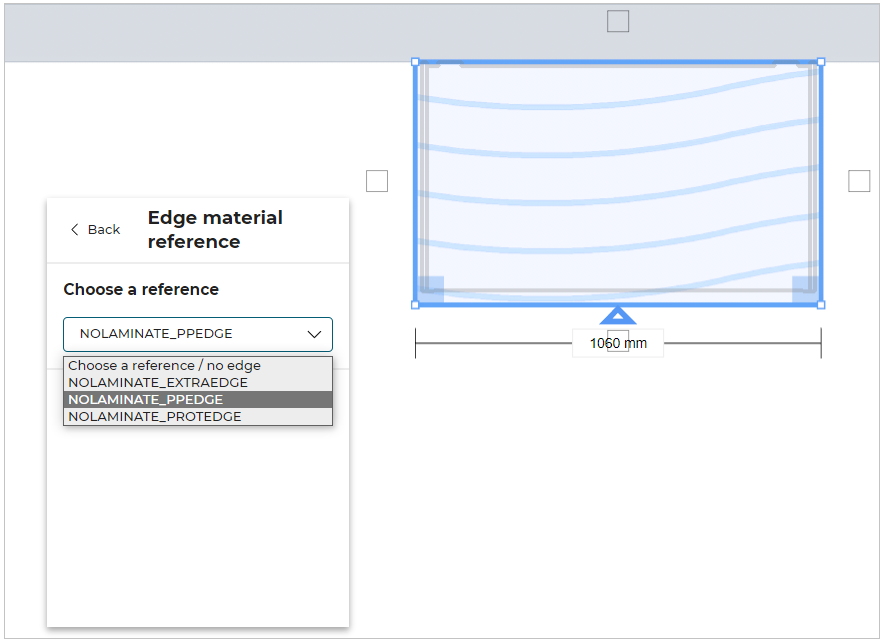
If you select Choose a reference/ No edge option, the edge product will be removed.
You can add edge product by selecting the edge of the worktop and click ADD from Add edge product option.
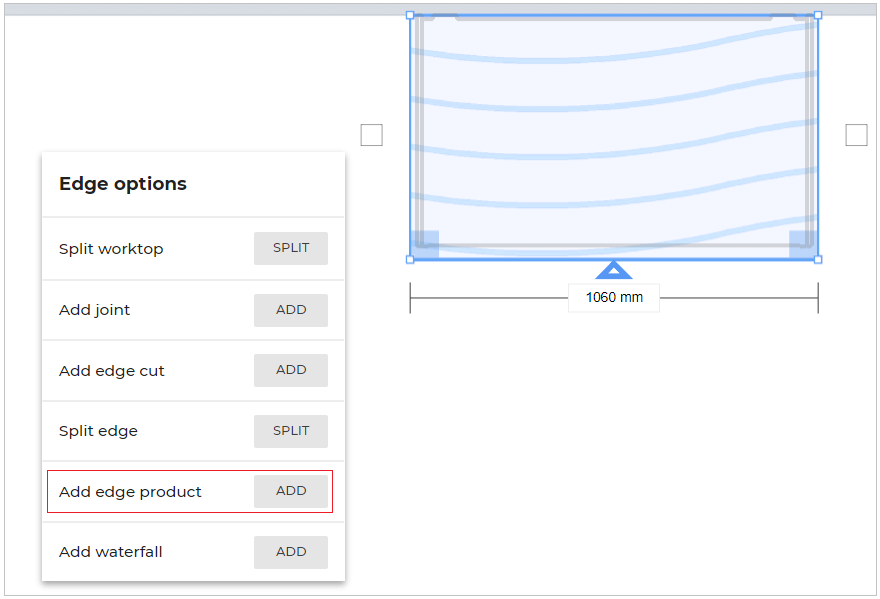
A check box allows you to define the front edge of a worktop. The front edge is then marked with a triangle shape, as shown below:

For islands, the front of the worktop can be defined on more than one edge.
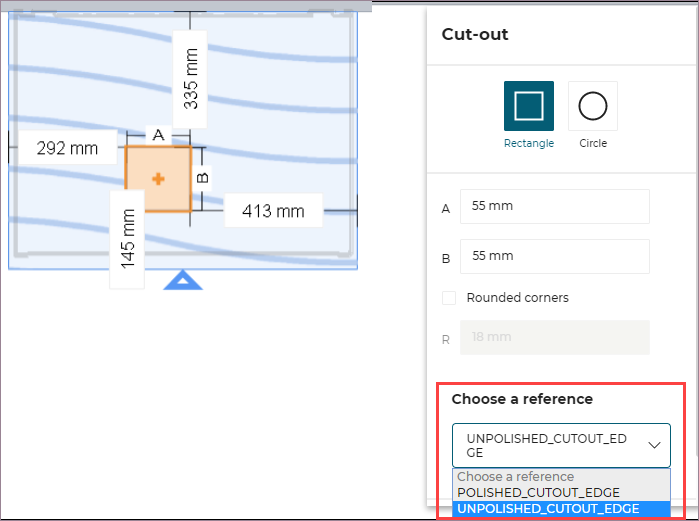
Cut-Out Edge Products
In specific cases, the customer can add an edge finish product to cut-outs. Compatible edge products depend on the worktop type; i.e predefined worktop or custom worktop.
Compatible edge products for predefined worktop type are listed via the 'operationCompatibility' parameter. Four types of cut-outs can be listed.
Example of predefined worktop type: Quartz Grey
Compatible edge products for custom worktop type are listed via the 'cutOutEdgeCompatibility' parameter.
Example of customizable worktop type: Acrylic White
For custom worktop, it is possible to add both the parameters, i.e.'cutOutEdgeCompatibility' and 'operationCompatibility'.
However, it is mandatory if 'cutOutEdgeCompatibility' parameter is set, 'operationCompatibility' parameter must not have the predefined cut-out edge finish products.
Add Waterfall Solution
Refer to the Waterfall section for details.
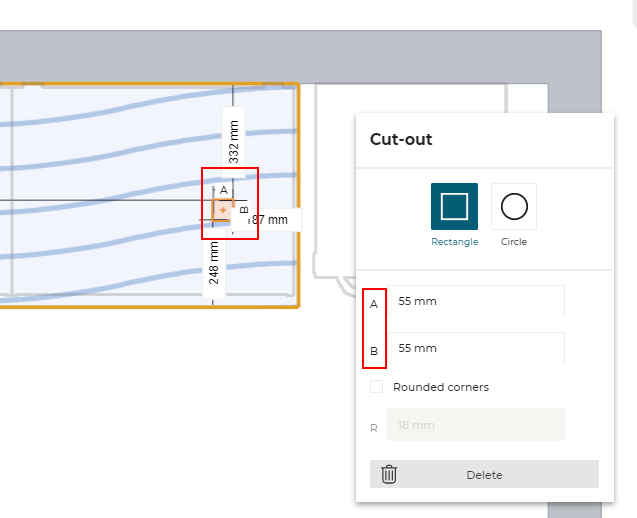
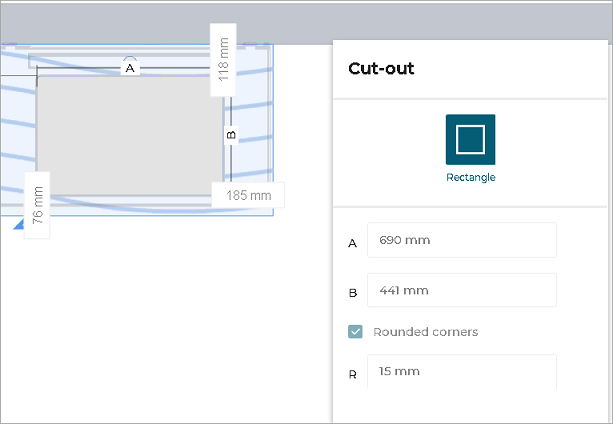
Add a Cut-Out
Manual Cut-Out
⚙️ Set up: 'operationCompatibility' and 'cornerRadius' parameters
➡️ See also the Applicative Rules for Worktop Cut-Outs 🔗.
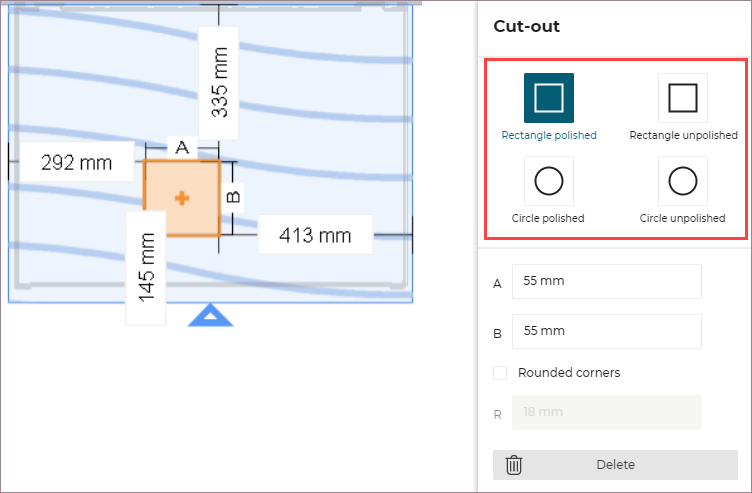
The customer has the possibility to add a cut-out anywhere on the worktop by clicking the destination place on the worktop. S/he can then define the shape of the cut-out (either rectangular or circular) and specify its exact position and dimensions.
Automatic Cut-Out
⚙️ Set up: 'sinkCutOutEdge' component linked to 'sinkCutOutEdge' parameter
➡️ See also the Applicative Rules for Worktop Automatic Cuts 🔗.
The products listed in 'sinkCutOutEdge' parameter are automatically set on the cut-out based on associated product rule.
Automatic cut-outs are typically used for sinks. These cut-outs can be available in item list and for manufacturing purposes.
These cut-outs cannot be modified.
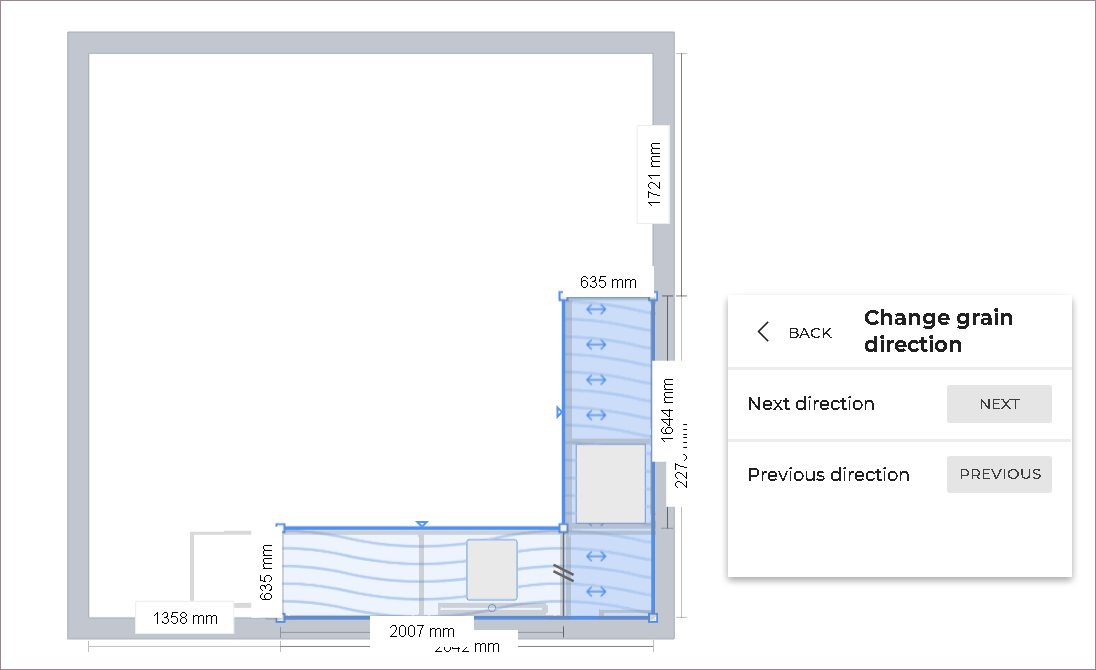
Change Grain Direction
➡️ See also the Applicative Rules for Custom Worktop Availability 🔗.
The User can change the grain direction of each board with the "Next" and "Previous" directions. The available directions are aligned with the edges of the board.
The default grain direction of a worktop board is aligned with the front edge.
The default direction of a waterfall board is aligned with the longest edge of the board
Delete Worktop
The customer will be able to delete worktop by selecting Delete from the worktop options in 2D view.
📌 A worktop once deleted can be added by clicking "undo" or clicking "add", in Edit panel of the cabinet, for worktop option.
Validate Worktop
⚙️ Set up: Application distribution parameter rulePopin 🔗.
If the value of the parameterrulePopinis set to editorValidated, then a pop-up message is displayed to resolve the issue.
Once you have modified the worktop according to the requirements and to finalise the modifications:
- Click the Validate button.
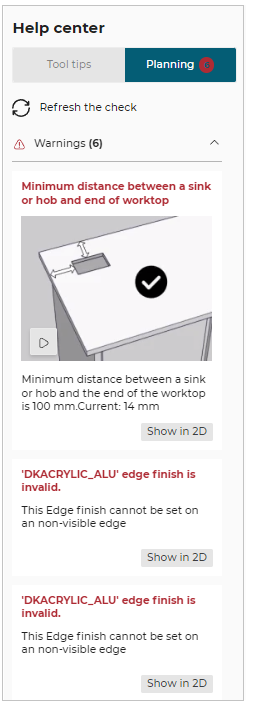
If your design has issues to be resolved, then the message is displayed, as shown below:

When you validate a worktop for the first time, you will see a pop-up message asking you to resolve issues.
- Click the Resolve issues button.
The Help Center window is displayed, as shown below:
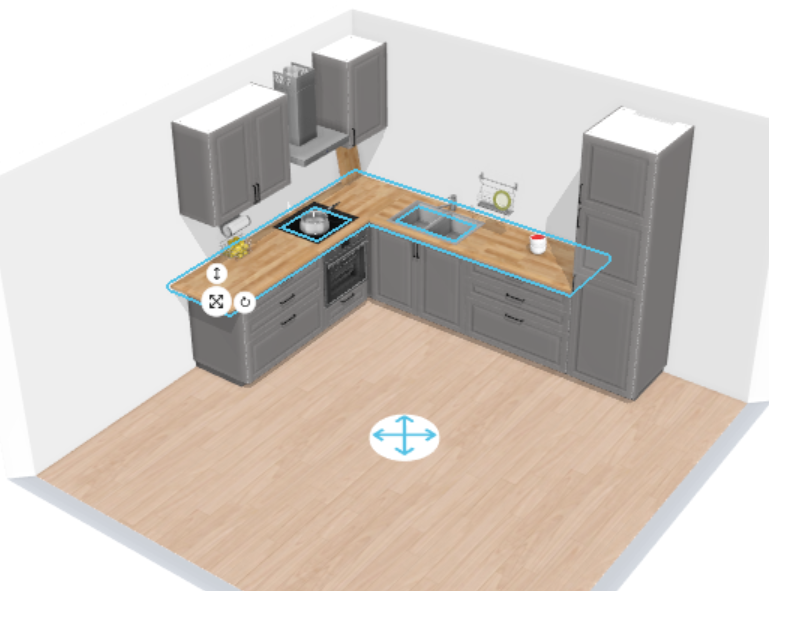
Moving Worktop
Its possible to move the custom worktop i.e. worktop edited using Advanced Options via the Worktop Editor.
Select the custom worktop in 3D.
Move, Rotate & Elevate manipulators are displayed. You can move the worktop using these manipulators.
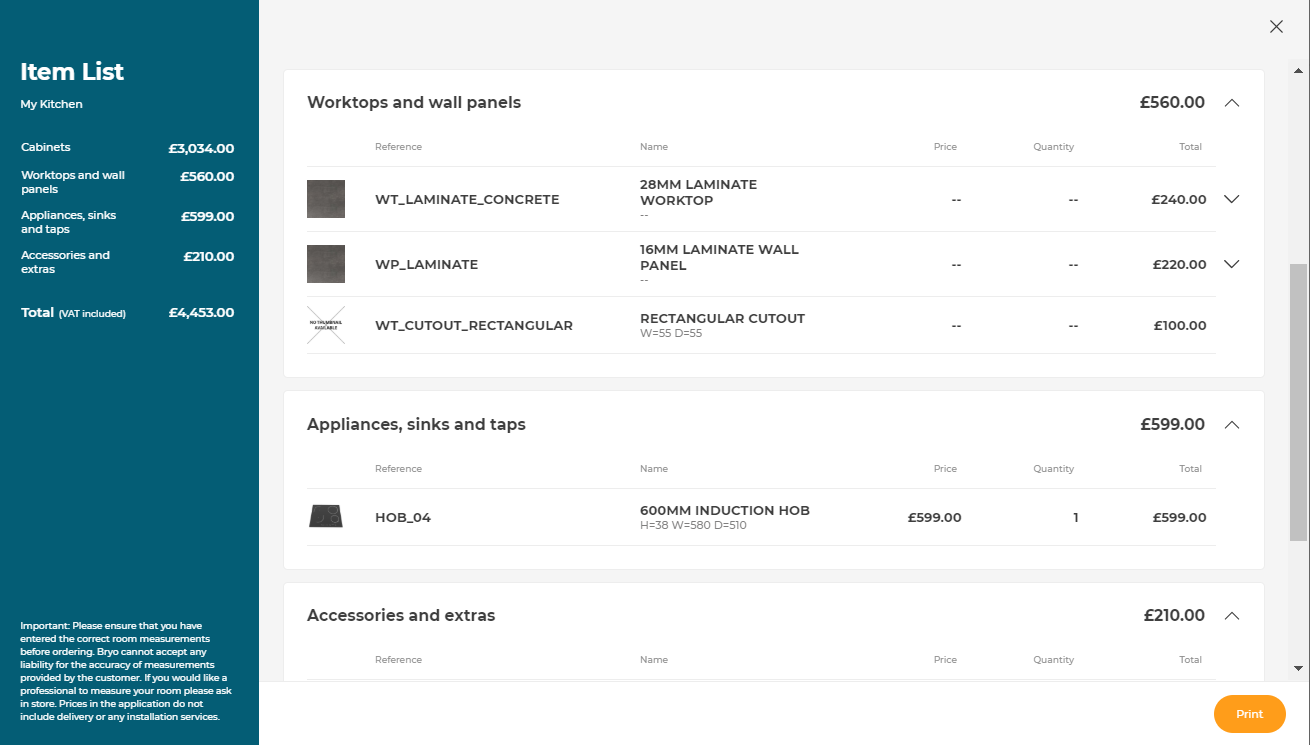
Possible Result in the Item List
Like all the illustrations in this page, this is a BRYO sample
Depending on the customer's choice, all products are priced separately and visible in the item list.